Monthly Archives: May 2014

How to update firmware in individual Avaya 96xx phones

If you have an Avaya telephone system, you probably have a web server to manage firmware. If not, it’s pretty easy to set up so let me know if I should post the procedures. What is not easy is testing firmware before deploying it to the whole network. What if you just want to update one particular phone? What if someone is complaining about something (e.g. continuous reboots) and you want to update their firmware to see if it fixes it? You could set up a development web server and statically assign the file server address to the phone. But then you have to statically assign all addresses on the phone or the DHCP server will overwrite the file server address. And this isn’t a permanent fix because the phone will forever have a statically assigned address. You could do tricky things in Apache using the IP address of the phone in the http.conf file or .htaccess, but there’s another way.

The trick is in the 96xxupgrade.txt file on your web server. As with most of these posts, we need to assume you have a web server and have access to the root html folder. Find the 96xxupgrade.txt, open it in any text editor and you should see something similar to this (if you’re using the sample file from Avaya):

############################################################
## Check backup application version                       ## 
############################################################
IF $MODEL4 SEQ 9610 goto BACKUPAPP96XX
IF $MODEL4 SEQ 9620 goto BACKUPAPP9640
IF $MODEL4 SEQ 9630 goto BACKUPAPP96XX
IF $MODEL4 SEQ 9640 goto BACKUPAPP9640
IF $MODEL4 SEQ 9650 goto BACKUPAPP96XX
IF $MODEL4 SEQ 9670 goto BACKUPAPP9670
goto END

This is the stuff Avaya put in the sample file so individual types of phones can download different versions of firmware. Note how there’s a check against a “$MODEL4” variable? This allows the phone to jump to a new section after a very basic check. Unfortunately, there are only a few variables available. I’ve never been able to find a definitive list of all available variables, but we can make this work with the GROUP variable.

So let’s say you want to test version ha96xxua3_2_0_S.bin of the 9600 firmware on your 9630 phone at your own desk before deploying to the entire network. In the 96xxupgrade.txt file, go to the section for the 9630s (probably BACKUPAPP96XX if you have the default Avaya file)

Your file will probably have a section like this:

# BACKUPAPP96XX

IF $BOOTNAME SEQ hb96xxua3_1_03_S.bin goto PHONEAPP96XX
SET APPNAME hb96xxua3_1_03_S.bin
goto GETSET

This just tells the phone to check its firmware version and if it’s already 3_1_03_S, then go to PHONEAPP96XX. If not, set its version to 3_1_03_S, which will cause the phone to download the new file, reboot, write it to flash, and reload the 96xxupgrade.txt file. Then when it gets to this line, it will have the version 3_1_03_S and jump to PHONEAPP96XX. Why is there a goto GETSET? Well, that’s there in case the phone cannot find the file. It will just jump to GETSET.

Within the PHONEAPP96XX section, my file says

 # PHONEAPP96XX
SET APPNAME ha96xxua1_1_03_S.bin
goto GETSET

Maybe yours does too. This just sets the application file to the right name. Again, causing the phone to load the file, reboot, write to flash, and reboot again. Then when it gets to this section, it jumps to GETSET. When you download new firmware, the phone reboots four times as it works through all these files.

In GETSET, my file says

GET 46xxsettings.txt
goto END

And this again is an Avaya default. I don’t have any 4600 series phones. I guess I should rename mine to 96xxsettings.txt. But it doesn’t matter. The settings file contains tons of options. Tons.

So back to my point. How do you load different firmware for a single phone? What you can do is perform a check against the phone’s GROUP variable. My 96xxupgrade file now has this line in the BACKUPAPP96XX section:

# BACKUPAPP96XX
IF $GROUP SEQ 30 goto BACKUPAPP30
IF $BOOTNAME SEQ hb96xxua3_1_03_S.bin goto PHONEAPP96XX
SET APPNAME hb96xxua3_1_03_S.bin
goto GETSET

When the phone gets to that line in red, it will check against its own internal GROUP variable and jump to BACKUPAPP30 if it matches. Now you can add the firmware version you want in that section by adding the following lines to the file:

# BACKUPAPP30
IF $BOOTNAME SEQ hb96xxua3_2_0_S.bin goto PHONEAPP30
SET APPNAME hb96xxua3_2_0_S.bin
goto GETSET

# PHONEAPP30
SET APPNAME ha96xxua3_2_0_S.bin
goto GETSET

So the phone will jump to a new section of the file and load specific firmware based upon its GROUP variable. Note that you can also “goto GETSET30” for example if you wanted to load a different settings file for this phone. In my case, I just want to test version ha96xxua3_2_0_S of firmware.

So how to you set the phone’s GROUP variable? Two ways:

Method 1 – Page 3 of the station form within SAT of your Communication Manager:

display station 4799                                            Page   3 of   7
                                     STATION

             Conf/Trans on Primary Appearance? n
   Bridged Appearance Origination Restriction? n


               Call Appearance Display Format: disp-param-default
                            IP Phone Group ID: 30
Enhanced Callr-Info Display for 1-Line Phones? n

                              ENHANCED CALL FORWARDING
                                       Forwarded Destination         Active
 Unconditional For Internal Calls To:                                   n
                   External Calls To:                                   n
          Busy For Internal Calls To:                                   n
                   External Calls To:                                   n
      No Reply For Internal Calls To:                                   n
                   External Calls To:                                   n

            SAC/CF Override: n

This method will “follow the station” so if you log a new extension into the phone, the GROUP will follow the new extension and will likely change. Then when the phone reboots, it will load new firmware. If you log your extension into another phone and then reboot that phone, it will load new firmware.

Method 2 – The “GROUP” menu item on the config screen of the 9630 telephone (Usually accessed by pressing Mute-CRAFT-# on the 9630, or pressing *-CRAFT-# at boot-up).

GROUP-item-in-craft-menu

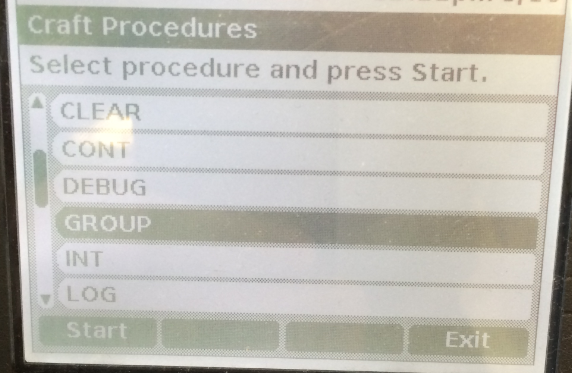
This method will “follow the phone” so if you log a new extension into the phone, it will retain the phone’s setting. However, it gets over-ridden by the station’s group if there is one. Interaction gets complicated. I always use the station form.

And lastly, this is how we load SIP firmware in the 9630 using the same network and DHCP server we already have. We can check the value of the SIG variable, which is set in the CRAFT menu. But that’s a different post. For now, I hope this helps and I look forward to hearing from you.

Updating firmware on Avaya TN799DP Circuit Packs

There are tons of documents that describe the firmware update procedures for the Avaya circuit packs and media modules. This document is meant to be simple, and as I often do for these posts, it’s is also written for myself for future reference. I have found that I update firmware just a few months after I’ve forgotten how to do it.

I will assume you know what firmware to load. There’s a hard-to-find matrix on support.avaya.com that will tell you and I’ll include this procedure in a future post. For now, let’s say you have the firmware you want for your card. This post is for the TN799DP (C-LAN) cards but the procedures are similar on other cards as well.

Step 1 – Make some notes

You’ll want to have the following handy – paste into notepad or something:

  • The exact card type including the suffix (TN799DP in my case),
  • The board location
  • The current firmware version. “list config all” will tell you these first three.
  • The IP address of the C-LAN. “list ip-interface clan” will tell you this.
  • The username and password you will use for file transfers. This is temporary – File transfer will get disabled automatically when you’re done so don’t worry about crazy passwords.
  • The exact filename of the firmware.
list configuration all                                                 Page   1

                              SYSTEM CONFIGURATION

Board                                                     Assigned Ports
Number   Board Type              Code     Vintage    u=unassigned t=tti p=psa

01A00    POWER SUPPLY              655A
01A01    IP SERVER INTFC         TN2312BP HW36 FW056 01 02 03 04 05 06 07 08
01A03    CONTROL-LAN              TN799DP HW01 FW040 u  u  u  u  u  u  u  u
                                                     u  u  u  u  u  u  u  u
                                                     17
01A04    DS1 INTERFACE            TN464GP HW02 FW025 01 02 03 04 05 06 07 08
                                                     09 10 11 12 13 14 15 16
                                                     17 18 19 20 21 22 23 24
                                                     25 26 27 28 29 30 31 u
01A05    CONTROL-LAN              TN799DP HW16 FW040 u  u  u  u  u  u  u  u
                                                     u  u  u  u  u  u  u  u
                                                     17
01A06    ANALOG LINE              TN746B  000013     01 02 03 04 05 06 07 08
                                                     09 10 11 12 13 14 15 16
list ip-interface clan

                                IP INTERFACES

                                                            Skts  Net       Eth
ON  Slot   Code/Sfx Node Name/       Mask  Gateway Node     Warn  Rgn VLAN  Link
                    IP-Address
--  ----   -------- ---------------  ----  ---------------  ----  --- ---- ----
 y  01A03  TN799  D CLAN_01A03       /24   Gateway001       400   6   n    1
                    10.10.11.5
 y  01A05  TN799  D CLAN_01A05       /24   Gateway001       400   6   n    2
                    10.10.11.9
 y  01B10  TN799  D CLAN_01B10       /24   Gateway001       400   6   n    4
                    10.10.11.8

At the time of this posting, I want those C-LANs to say FW043. Note there’s a special case with C-LANs. I have one at hardware version HW01, and one at hardware version HW16. There are two different version 43 firmware files for these!

Step 2 – Enable file transfer on the C-LAN

From the CLI, type “enable filexfer” and fill out the form. If file transfer is already enabled for the board you want, you may need to disable it and re-enable it. If there are files already on the board, you will need to remove them. You can “list directory board xxxx” to see the files, and “remove directory board xxxxx” to remove them. Then you can disable the filexfer and re-enable it with the password you want.

enable filexfer                                                 Page   1 of   1


                                 ENABLE FILE TRANSFER

                    Login: roger
                 Password:
         Reenter Password:
                   Secure? y
            Board address: 01a05

Step 3 – Transfer the file to the C-LAN

Use whatever file transfer method (WinSCP, ftp, ssh, sftp, etc) to move the firmware file to the card. When it’s done, you can “list directory board xxxx” to make sure the file transferred correctly. Avaya is very good at confirming the file transferred correctly and is appropriate to your card. In my humble opinion, Avaya’s deep roots in telecom have made this process smooth. It’s designed for remote work and verification. Of course now I have jinxed myself and will brick-a-clan tonight when I update my system.

list directory board 01A05

                                LIST DIRECTORY

Board                File/Directory                    Creation       Size  Pro-
Loc                      Name                       Date       Time    Kb   tect
01A05 F:tn799dp-h13-f43-sig.bin                   2014/04/24 15:53:54 4729   n

Step 4 – Start the update

This is the part that affects service. If your C-LAN is serving any phones (“status socket” to see), then you should wait until after-hours. C-LANs serve 400 phones maximum, so you could disable phone registrations on the C-LAN after hours and update the card mid-day if you’d like. If you “change ip-interface xxxxx” you’ll see a parameter called “Allow H.323 Endpoints”. The scary part is you have to set “Enable Interface” to N before you can change that. The first time I did this, I was worried that I wouldn’t be able to manage the C-LAN but don’t worry – you are managing it via the G650 backplane so you can disable the interface and still manage the card.

Open a separate command prompt and continuously ping the C-LAN’s IP address.

Now type “change firmware download 1” and fill out the form. For the source board, use your C-LAN, file server is “none”. The image file name is the exact name of your firmware file including the “.bin” extension. The target board codes is TN799 and the Suffix is DP. Vintage is blank. I never schedule the updates, so I say “n” to schedule. According to my docs, the C-LAN can only be updated from its own file system, so you might as well “Remove Image File After Successful Download” so you don’t have to delete it yourself (this also disables file transfer for you). The target location is the same as the Source Board Location (i.e. itself), and submit.

change firmware download 1                                      Page   1 of   1
                               FIRMWARE DOWNLOAD          Schedule: 1
   Source Board Location: 01a05        File Server: none

Firmware Image File Name: tn799dp-h13-f43-sig.bin
       Target Board Code: TN799   Suffix: DP  Firmware Vintage:
       Schedule Download? n


    Target          Target          Target          Target          Target
   Location        Location        Location        Location        Location
 1. 01a05       11.             21.             31.             41.
 2.             12.             22.             32.             42.
 3.             13.             23.             33.             43.
 4.             14.             24.             34.             44.
 5.             15.             25.             35.             45.
 6.             16.             26.             36.             46.
 7.             17.             27.             37.             47.
 8.             18.             28.             38.             48.
 9.             19.             29.             39.             49.
10.             20.             30.             40.             50.

This is where Avaya confirms the firmware file is complete, signed correctly, and is appropriate for your card. In the past, I have intentionally tried to update with the wrong firmware and I get an Abort code. Anyway, submit the correct filename and then do a “stat firm down 1”

Step 5 – Monitor the update

Now wait. At some point the pings will drop then come back. You can check the status of the update with “status firmware download 1”. The status code will be Pending, Complete, Failed, or Aborted. If failed or aborted – check the documentation for the reason code. If you’re like me, you have tons of PDFs of Avaya documentation in your hard drive. I end up using Google anyway.

status firmware download 1
                            STATUS FIRMWARE DOWNLOAD      Schedule: 1
   Source Board Location: 01A05        File Server: none

Firmware Image File Name: tn799dp-h13-f43-sig.bin
       Target Board Code: TN799   Suffix: DP  Firmware Vintage: 43
       Schedule Download? n
   Start Date/Time: 05/02/2014  00:01    Stop Date/Time:   /  /        :

   Target    Status    Reason              Target    Status    Reason
   Location            Code                Location            Code
 1. 01A05    Pending                    11.

You should see “Pending” for the download state. Soon your pings will drop. It takes a few minutes. In my experience it will take just long enough for me to panic, plus 30 seconds. Not worried, but actually concerned. After 30 seconds of “oh crap I’m going to have to drive the site”, the update completes. I have noticed the HW01 vintage was MUCH slower than the HW16.

If you have a lot of updates and trust the system, you can run these in parallel with “change/status firmware download x” where x is between 1 and 4. So you can have up to four firmware updates running at a time. I’ve done it – it works. And by the time you’re done with the fourth one, the first one is probably done.

 Step 6 – Verify

When the update is done, the “status firm down 1” will blank out. When you “list config” you should see your new firmware version. However, the ping did not come back! I am embarrassed to say I panicked. I did a “busy board” If you disabled the ip-interface then enable it. Type “status sock” and check for registered phones. Phones should move back to it as the CM balances the traffic. you can also disable other ip-interfaces momentarily to encourage phones to move to it immediately.

status socket-usage
                           SOCKET USAGE

                                 Total Registered IP Endpoints: 872
 Registered IP Endpoints with TCP Signaling Socket Established: 872
                                            Total Socket Usage: 00926/02900

Intf         Board Socket      Net    Intf          Board Socket      Net
Type   Loc    Sfx  Usage       Rgn    Type   Loc    Sfx   Usage       Rgn

procr              442/1700    250
CLAN   01A03   D   162/400     1
CLAN   01A05   D   161/400     1
CLAN   01B10   D   161/400     1

 What if the ping doesn’t come back?

Strangely, the ping doesn’t stop when you disable the ip interface. But once the firmware is done loading and the “stat firm down 1” shows nothing and the “list config” shows the right SW version, what if the pings still timeout? Well first, give it a good long time. You really need to panic before the firmware will finish. If that doesn’t seem to work, then “change ip-i xxxxx” and enable the ip-interface. The pings respond? Mine did. If yours don’t, you can try “busy board xxxxx” then “release board xxxxx”. That always works for me. If it still doesn’t work, Avaya would probably recommend pulling the board and re-seating it. There are a bunch of test procedures though. I assume performing a busy/release would Abort if you try it while the firmware is loading, but I don’t want to try. Let me know if you do it.

Summary

That’s it. The first time is scary, then it gets easier. Especially since this is done so infrequently that, as usual I start to forget the exact procedures. Good luck all and let me know how it goes. Thanks as always, Roger.