Author Archives: roger

Troubleshooting Signaling Manipulation (SigMa) Scripts in Avaya Aura SBC

This is pretty obscure and I’m probably only talking to three people on the Internet right now, but if you have ever tried to troubleshoot SigMa scripts in the Avaya Aura Session Border Controller, you probably wish it had better logging. Actually, if you have ever gotten logging to work, please let me know. I had given up. However – I recently discovered a nice easy way to troubleshoot signaling manipulation, and consequently also discovered just how cumbersome this process really is.

The easy way to log is to set your own custom header in the SigMa script, then inspect the INVITE from the Session Manager’s point of view. For example, I added this SigMa script:

    act on request where {0ed28e3470e974017c124b0897303dd14e34b5245564abb28916e7d48d9b07c0}DIRECTION="INBOUND" and {0ed28e3470e974017c124b0897303dd14e34b5245564abb28916e7d48d9b07c0}ENTRY_POINT="PRE_ROUTING" {
        if({0ed28e3470e974017c124b0897303dd14e34b5245564abb28916e7d48d9b07c0}HEADERS["To"][1].URI.USER.regex_match("2025556199"))then {
            {0ed28e3470e974017c124b0897303dd14e34b5245564abb28916e7d48d9b07c0}HEADERS["roger-debug"][1] = {0ed28e3470e974017c124b0897303dd14e34b5245564abb28916e7d48d9b07c0}HEADERS["From"][1].URI.USER; 
            append({0ed28e3470e974017c124b0897303dd14e34b5245564abb28916e7d48d9b07c0}HEADERS["roger-debug"][1],"<");
            append({0ed28e3470e974017c124b0897303dd14e34b5245564abb28916e7d48d9b07c0}HEADERS["roger-debug"][1],"2135551212");
            append({0ed28e3470e974017c124b0897303dd14e34b5245564abb28916e7d48d9b07c0}HEADERS["roger-debug"][1],"@roger.corp>");
        }
    }

This SigMa script checks for calls to 202-555-6199 and creates a new header. Then, within Session Manager, you can look at the full header and see this info:

INVITE sip:2027216199@ares.corp SIP/2.0 
From: "PHONEGUY ROGER " <sip:6265554799@ares.corp>;tag=6698455617080545_c1b09.2.2.1404967301186.0_7074379_15030130 
To: <sip:2025556199@telco.corp> 
CSeq: 2 INVITE 
Call-ID: 9959340302389262@12.11.18.20 
Contact: <sip:10.10.20.71:5060;transport=tcp> 
Record-Route: <sip:10.10.20.71:5060;ipcs-line=63646;lr;transport=tcp> 
Allow: INVITE,ACK,CANCEL,BYE,INFO,PRACK 
Max-Forwards: 64 
Via: SIP/2.0/TCP 10.16.26.71:5060;branch=z9hG4bK-s1632-000279738415-1--s1632- 
Accept: application/sdp, application/isup, application/dtmf, application/dtmf-relay, multipart/mixed 
P-Asserted-Identity: "PHONEGUY ROGER " <sip:6265554799@telco.corp> 
Content-Disposition: session; handling=required 
Content-Type: application/sdp 
roger-debug: roger-debug: 6265554799< 
roger-debug: roger-debug: 62655547992135551212 
roger-debug: roger-debug: 6265554799@roger.corp> 
Content-Length: 241 
 
v=0 
o=Sonus_UAC 11647 11015 IN IP4 10.16.26.71 
s=SIP 
c=IN IP4 10.16.26.71 
t=0 0 
m=audio 19234 RTP/AVP 18 0 100 
a=rtpmap:18 G729/8000 
a=rtpmap:0 PCMU/8000 
a=rtpmap:100 telephone-event/8000 
a=fmtp:100 0-15 
a=sendrecv 
a=maxptime:30

For quick one-liners, this is pretty handy. However, you can see my attempt at creating ONE header with a new p-asserted-identity completely failed. I can generate a new header, but my attempts to append to it only created another header. I really hope the new version of software adds some better manipulation features. In the meantime, I’ll keep hacking away at it.

If anyone out there knows SigMa, please let me know!

How I stopped one hundred percent of all telemarketers.

At the beginning of 2014, I got an aggressive telemarketer call at my house. Like most people, I really hate telemarketing calls so I let my 13-year-old son take the call. Well, my son said the caller said something really rude but he didn’t really hear. At that point, I said “hey, I’m a telephone guy. I should be able to stop this.” So I did.

Being a telephone guy, I cannot imagine NOT having a landline at home. I have AT&T U-Verse so it’s not like I have old-school POTS service anyway, but I like my home telephone numbers and don’t want to disconnect them. And hey, this was all an experiment anyway. So I got a new telephone number from a SIP provider and forwarded my home line to it, then via that SIP provider I routed it to my Asterisk server at a cloud provider. Then I added an Analog Terminal Adapter at home and plugged my home cordless phone into that. So I’m kinda like a Vonage or any other VoIP provider now. Incoming calls come into the SIP provider, then my Asterisk server, and then to my house via the ATA. Outgoing calls go out my Asterisk server then to my SIP provider. Pretty basic stuff. Yes, I tested 911.

Then I created a “white list” inbound app on Asterisk where all incoming callers get a greeting “hey, if you’re a real person press a digit and you’ll ring through to my house. If you don’t press a button, you’ll go to voicemail”. If a caller presses a button, their caller-id is added to the “white list” and rings to my house. From then on, that caller-id is allowed. After each call, I get an email with the caller-id and caller-id name of the caller, along with what happened to the call (e.g. rang through, went to voicemail, or hungup). It worked perfectly. It turns out that in the last six months, 100{0ed28e3470e974017c124b0897303dd14e34b5245564abb28916e7d48d9b07c0} of telemarketers are using predictive dialers; their machine thinks it got an answering machine and simply calls back later.

So on the email notification, I added a link to let me set the “disposition” of the caller-id next time. For friends, relatives, vendors, service providers, schools, etc, I can grant access next time. For obvious telemarketers (“SUN SOLAR”, “ELITE SERVICES”, etc), I can reject the call completely (“I’m sorry, your call did not go through”).

Sweet relief! It’s my telephone again! Now when the phone rings, I know it’s a real person and probably want to talk to him or her. I figured some telemarketers would punch through occasionally, but they don’t. I’ve stopped them all.

But here’s where it got interesting. I kept getting repeated calls from the same numbers – sometimes four within one minute. I get calls from particular numbers every night at about the same time. I got calls from fake numbers like “10000000000” or “16261346229”. That last one may not be obvious, but the first digit of an office code cannot be a 0 or 1. There’s no possible telephone number 134-6229 in the 626 area code. Now that my number is “protected”, I could even call the valid numbers back without worrying about tipping them off. When I did, I would get “Thank you for calling back. To be removed from our list…” or sometimes I would get a home-made “your call cannot be completed as dialed” message. Or sometimes just a fast busy or dead-air then disconnect. Obvious telemarketers.

So great, I’m blocking telemarketers and none are getting through, but I’m not causing them pain. I’m just blocking their dialing machine with my blocking machine. What if I send telemarketers to a greeting that says “hello” a few times, then tells them to hang on? Would that cause the predictive dialer to cut the agent through to me? If so, it would at least burn some “human time” and cost the telemarketing company some money, right? I tried it, and this was the result:

Not bad! I wasted 41 seconds of her time! So clearly I can get my telephone system to fool the predictive dialer into thinking it found a real person. I figured if I could combine some “detect noise” and “detect silence” algorithms into this thing, could I keep them on the phone longer? And how would I do it without any kind of speech recognition? Could I really keep a telemarketer on the phone just by detecting noise and silence? It turns out I could:

I really have to say thanks to Sofia for this call. Ironically, I listened more closely to Sofia’s pitch (and so have my friends) than if I had just hung up on her at the beginning. But anyway, this gave me the confidence to build a more elaborate parrot. At this point, I have collected several dozen calls of various entertaining quality. I will post them individually. I hope you enjoy. Perhaps next post about this subject, I’ll get a bit more technical how the algorithm works.

How to remove an extension when there are messages waiting

Just a quick note regarding the message

Message(s) waiting; please delete message(s) first

If you try to remove a station with messages waiting, the Communication Manager will reject it if there are messages waiting. In my case, I wanted to convert a virtual station to a physical 9630, but the system won’t let me remove the station. And of course, I cannot change the type of station from Virtual to 9630 – I get this message:

"9630" Station must be removed and re-added to change type

As usual, the solution is simple once you know it. You can clear the message waiting indicator with “clear amw all xxxx“. This clears the messages flag (not the messages!) and turns off the message waiting indicator. This allows you to remove the station.

How to update firmware in individual Avaya 96xx phones

If you have an Avaya telephone system, you probably have a web server to manage firmware. If not, it’s pretty easy to set up so let me know if I should post the procedures. What is not easy is testing firmware before deploying it to the whole network. What if you just want to update one particular phone? What if someone is complaining about something (e.g. continuous reboots) and you want to update their firmware to see if it fixes it? You could set up a development web server and statically assign the file server address to the phone. But then you have to statically assign all addresses on the phone or the DHCP server will overwrite the file server address. And this isn’t a permanent fix because the phone will forever have a statically assigned address. You could do tricky things in Apache using the IP address of the phone in the http.conf file or .htaccess, but there’s another way.

The trick is in the 96xxupgrade.txt file on your web server. As with most of these posts, we need to assume you have a web server and have access to the root html folder. Find the 96xxupgrade.txt, open it in any text editor and you should see something similar to this (if you’re using the sample file from Avaya):

############################################################
## Check backup application version                       ## 
############################################################
IF $MODEL4 SEQ 9610 goto BACKUPAPP96XX
IF $MODEL4 SEQ 9620 goto BACKUPAPP9640
IF $MODEL4 SEQ 9630 goto BACKUPAPP96XX
IF $MODEL4 SEQ 9640 goto BACKUPAPP9640
IF $MODEL4 SEQ 9650 goto BACKUPAPP96XX
IF $MODEL4 SEQ 9670 goto BACKUPAPP9670
goto END

This is the stuff Avaya put in the sample file so individual types of phones can download different versions of firmware. Note how there’s a check against a “$MODEL4” variable? This allows the phone to jump to a new section after a very basic check. Unfortunately, there are only a few variables available. I’ve never been able to find a definitive list of all available variables, but we can make this work with the GROUP variable.

So let’s say you want to test version ha96xxua3_2_0_S.bin of the 9600 firmware on your 9630 phone at your own desk before deploying to the entire network. In the 96xxupgrade.txt file, go to the section for the 9630s (probably BACKUPAPP96XX if you have the default Avaya file)

Your file will probably have a section like this:

# BACKUPAPP96XX

IF $BOOTNAME SEQ hb96xxua3_1_03_S.bin goto PHONEAPP96XX
SET APPNAME hb96xxua3_1_03_S.bin
goto GETSET

This just tells the phone to check its firmware version and if it’s already 3_1_03_S, then go to PHONEAPP96XX. If not, set its version to 3_1_03_S, which will cause the phone to download the new file, reboot, write it to flash, and reload the 96xxupgrade.txt file. Then when it gets to this line, it will have the version 3_1_03_S and jump to PHONEAPP96XX. Why is there a goto GETSET? Well, that’s there in case the phone cannot find the file. It will just jump to GETSET.

Within the PHONEAPP96XX section, my file says

 # PHONEAPP96XX
SET APPNAME ha96xxua1_1_03_S.bin
goto GETSET

Maybe yours does too. This just sets the application file to the right name. Again, causing the phone to load the file, reboot, write to flash, and reboot again. Then when it gets to this section, it jumps to GETSET. When you download new firmware, the phone reboots four times as it works through all these files.

In GETSET, my file says

GET 46xxsettings.txt
goto END

And this again is an Avaya default. I don’t have any 4600 series phones. I guess I should rename mine to 96xxsettings.txt. But it doesn’t matter. The settings file contains tons of options. Tons.

So back to my point. How do you load different firmware for a single phone? What you can do is perform a check against the phone’s GROUP variable. My 96xxupgrade file now has this line in the BACKUPAPP96XX section:

# BACKUPAPP96XX
IF $GROUP SEQ 30 goto BACKUPAPP30
IF $BOOTNAME SEQ hb96xxua3_1_03_S.bin goto PHONEAPP96XX
SET APPNAME hb96xxua3_1_03_S.bin
goto GETSET

When the phone gets to that line in red, it will check against its own internal GROUP variable and jump to BACKUPAPP30 if it matches. Now you can add the firmware version you want in that section by adding the following lines to the file:

# BACKUPAPP30
IF $BOOTNAME SEQ hb96xxua3_2_0_S.bin goto PHONEAPP30
SET APPNAME hb96xxua3_2_0_S.bin
goto GETSET

# PHONEAPP30
SET APPNAME ha96xxua3_2_0_S.bin
goto GETSET

So the phone will jump to a new section of the file and load specific firmware based upon its GROUP variable. Note that you can also “goto GETSET30” for example if you wanted to load a different settings file for this phone. In my case, I just want to test version ha96xxua3_2_0_S of firmware.

So how to you set the phone’s GROUP variable? Two ways:

Method 1 – Page 3 of the station form within SAT of your Communication Manager:

display station 4799                                            Page   3 of   7
                                     STATION

             Conf/Trans on Primary Appearance? n
   Bridged Appearance Origination Restriction? n


               Call Appearance Display Format: disp-param-default
                            IP Phone Group ID: 30
Enhanced Callr-Info Display for 1-Line Phones? n

                              ENHANCED CALL FORWARDING
                                       Forwarded Destination         Active
 Unconditional For Internal Calls To:                                   n
                   External Calls To:                                   n
          Busy For Internal Calls To:                                   n
                   External Calls To:                                   n
      No Reply For Internal Calls To:                                   n
                   External Calls To:                                   n

            SAC/CF Override: n

This method will “follow the station” so if you log a new extension into the phone, the GROUP will follow the new extension and will likely change. Then when the phone reboots, it will load new firmware. If you log your extension into another phone and then reboot that phone, it will load new firmware.

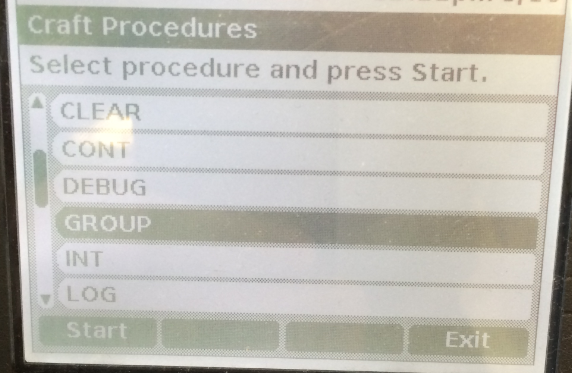
Method 2 – The “GROUP” menu item on the config screen of the 9630 telephone (Usually accessed by pressing Mute-CRAFT-# on the 9630, or pressing *-CRAFT-# at boot-up).

GROUP-item-in-craft-menu

This method will “follow the phone” so if you log a new extension into the phone, it will retain the phone’s setting. However, it gets over-ridden by the station’s group if there is one. Interaction gets complicated. I always use the station form.

And lastly, this is how we load SIP firmware in the 9630 using the same network and DHCP server we already have. We can check the value of the SIG variable, which is set in the CRAFT menu. But that’s a different post. For now, I hope this helps and I look forward to hearing from you.

Updating firmware on Avaya TN799DP Circuit Packs

There are tons of documents that describe the firmware update procedures for the Avaya circuit packs and media modules. This document is meant to be simple, and as I often do for these posts, it’s is also written for myself for future reference. I have found that I update firmware just a few months after I’ve forgotten how to do it.

I will assume you know what firmware to load. There’s a hard-to-find matrix on support.avaya.com that will tell you and I’ll include this procedure in a future post. For now, let’s say you have the firmware you want for your card. This post is for the TN799DP (C-LAN) cards but the procedures are similar on other cards as well.

Step 1 – Make some notes

You’ll want to have the following handy – paste into notepad or something:

  • The exact card type including the suffix (TN799DP in my case),
  • The board location
  • The current firmware version. “list config all” will tell you these first three.
  • The IP address of the C-LAN. “list ip-interface clan” will tell you this.
  • The username and password you will use for file transfers. This is temporary – File transfer will get disabled automatically when you’re done so don’t worry about crazy passwords.
  • The exact filename of the firmware.
list configuration all                                                 Page   1

                              SYSTEM CONFIGURATION

Board                                                     Assigned Ports
Number   Board Type              Code     Vintage    u=unassigned t=tti p=psa

01A00    POWER SUPPLY              655A
01A01    IP SERVER INTFC         TN2312BP HW36 FW056 01 02 03 04 05 06 07 08
01A03    CONTROL-LAN              TN799DP HW01 FW040 u  u  u  u  u  u  u  u
                                                     u  u  u  u  u  u  u  u
                                                     17
01A04    DS1 INTERFACE            TN464GP HW02 FW025 01 02 03 04 05 06 07 08
                                                     09 10 11 12 13 14 15 16
                                                     17 18 19 20 21 22 23 24
                                                     25 26 27 28 29 30 31 u
01A05    CONTROL-LAN              TN799DP HW16 FW040 u  u  u  u  u  u  u  u
                                                     u  u  u  u  u  u  u  u
                                                     17
01A06    ANALOG LINE              TN746B  000013     01 02 03 04 05 06 07 08
                                                     09 10 11 12 13 14 15 16
list ip-interface clan

                                IP INTERFACES

                                                            Skts  Net       Eth
ON  Slot   Code/Sfx Node Name/       Mask  Gateway Node     Warn  Rgn VLAN  Link
                    IP-Address
--  ----   -------- ---------------  ----  ---------------  ----  --- ---- ----
 y  01A03  TN799  D CLAN_01A03       /24   Gateway001       400   6   n    1
                    10.10.11.5
 y  01A05  TN799  D CLAN_01A05       /24   Gateway001       400   6   n    2
                    10.10.11.9
 y  01B10  TN799  D CLAN_01B10       /24   Gateway001       400   6   n    4
                    10.10.11.8

At the time of this posting, I want those C-LANs to say FW043. Note there’s a special case with C-LANs. I have one at hardware version HW01, and one at hardware version HW16. There are two different version 43 firmware files for these!

Step 2 – Enable file transfer on the C-LAN

From the CLI, type “enable filexfer” and fill out the form. If file transfer is already enabled for the board you want, you may need to disable it and re-enable it. If there are files already on the board, you will need to remove them. You can “list directory board xxxx” to see the files, and “remove directory board xxxxx” to remove them. Then you can disable the filexfer and re-enable it with the password you want.

enable filexfer                                                 Page   1 of   1


                                 ENABLE FILE TRANSFER

                    Login: roger
                 Password:
         Reenter Password:
                   Secure? y
            Board address: 01a05

Step 3 – Transfer the file to the C-LAN

Use whatever file transfer method (WinSCP, ftp, ssh, sftp, etc) to move the firmware file to the card. When it’s done, you can “list directory board xxxx” to make sure the file transferred correctly. Avaya is very good at confirming the file transferred correctly and is appropriate to your card. In my humble opinion, Avaya’s deep roots in telecom have made this process smooth. It’s designed for remote work and verification. Of course now I have jinxed myself and will brick-a-clan tonight when I update my system.

list directory board 01A05

                                LIST DIRECTORY

Board                File/Directory                    Creation       Size  Pro-
Loc                      Name                       Date       Time    Kb   tect
01A05 F:tn799dp-h13-f43-sig.bin                   2014/04/24 15:53:54 4729   n

Step 4 – Start the update

This is the part that affects service. If your C-LAN is serving any phones (“status socket” to see), then you should wait until after-hours. C-LANs serve 400 phones maximum, so you could disable phone registrations on the C-LAN after hours and update the card mid-day if you’d like. If you “change ip-interface xxxxx” you’ll see a parameter called “Allow H.323 Endpoints”. The scary part is you have to set “Enable Interface” to N before you can change that. The first time I did this, I was worried that I wouldn’t be able to manage the C-LAN but don’t worry – you are managing it via the G650 backplane so you can disable the interface and still manage the card.

Open a separate command prompt and continuously ping the C-LAN’s IP address.

Now type “change firmware download 1” and fill out the form. For the source board, use your C-LAN, file server is “none”. The image file name is the exact name of your firmware file including the “.bin” extension. The target board codes is TN799 and the Suffix is DP. Vintage is blank. I never schedule the updates, so I say “n” to schedule. According to my docs, the C-LAN can only be updated from its own file system, so you might as well “Remove Image File After Successful Download” so you don’t have to delete it yourself (this also disables file transfer for you). The target location is the same as the Source Board Location (i.e. itself), and submit.

change firmware download 1                                      Page   1 of   1
                               FIRMWARE DOWNLOAD          Schedule: 1
   Source Board Location: 01a05        File Server: none

Firmware Image File Name: tn799dp-h13-f43-sig.bin
       Target Board Code: TN799   Suffix: DP  Firmware Vintage:
       Schedule Download? n


    Target          Target          Target          Target          Target
   Location        Location        Location        Location        Location
 1. 01a05       11.             21.             31.             41.
 2.             12.             22.             32.             42.
 3.             13.             23.             33.             43.
 4.             14.             24.             34.             44.
 5.             15.             25.             35.             45.
 6.             16.             26.             36.             46.
 7.             17.             27.             37.             47.
 8.             18.             28.             38.             48.
 9.             19.             29.             39.             49.
10.             20.             30.             40.             50.

This is where Avaya confirms the firmware file is complete, signed correctly, and is appropriate for your card. In the past, I have intentionally tried to update with the wrong firmware and I get an Abort code. Anyway, submit the correct filename and then do a “stat firm down 1”

Step 5 – Monitor the update

Now wait. At some point the pings will drop then come back. You can check the status of the update with “status firmware download 1”. The status code will be Pending, Complete, Failed, or Aborted. If failed or aborted – check the documentation for the reason code. If you’re like me, you have tons of PDFs of Avaya documentation in your hard drive. I end up using Google anyway.

status firmware download 1
                            STATUS FIRMWARE DOWNLOAD      Schedule: 1
   Source Board Location: 01A05        File Server: none

Firmware Image File Name: tn799dp-h13-f43-sig.bin
       Target Board Code: TN799   Suffix: DP  Firmware Vintage: 43
       Schedule Download? n
   Start Date/Time: 05/02/2014  00:01    Stop Date/Time:   /  /        :

   Target    Status    Reason              Target    Status    Reason
   Location            Code                Location            Code
 1. 01A05    Pending                    11.

You should see “Pending” for the download state. Soon your pings will drop. It takes a few minutes. In my experience it will take just long enough for me to panic, plus 30 seconds. Not worried, but actually concerned. After 30 seconds of “oh crap I’m going to have to drive the site”, the update completes. I have noticed the HW01 vintage was MUCH slower than the HW16.

If you have a lot of updates and trust the system, you can run these in parallel with “change/status firmware download x” where x is between 1 and 4. So you can have up to four firmware updates running at a time. I’ve done it – it works. And by the time you’re done with the fourth one, the first one is probably done.

 Step 6 – Verify

When the update is done, the “status firm down 1” will blank out. When you “list config” you should see your new firmware version. However, the ping did not come back! I am embarrassed to say I panicked. I did a “busy board” If you disabled the ip-interface then enable it. Type “status sock” and check for registered phones. Phones should move back to it as the CM balances the traffic. you can also disable other ip-interfaces momentarily to encourage phones to move to it immediately.

status socket-usage
                           SOCKET USAGE

                                 Total Registered IP Endpoints: 872
 Registered IP Endpoints with TCP Signaling Socket Established: 872
                                            Total Socket Usage: 00926/02900

Intf         Board Socket      Net    Intf          Board Socket      Net
Type   Loc    Sfx  Usage       Rgn    Type   Loc    Sfx   Usage       Rgn

procr              442/1700    250
CLAN   01A03   D   162/400     1
CLAN   01A05   D   161/400     1
CLAN   01B10   D   161/400     1

 What if the ping doesn’t come back?

Strangely, the ping doesn’t stop when you disable the ip interface. But once the firmware is done loading and the “stat firm down 1” shows nothing and the “list config” shows the right SW version, what if the pings still timeout? Well first, give it a good long time. You really need to panic before the firmware will finish. If that doesn’t seem to work, then “change ip-i xxxxx” and enable the ip-interface. The pings respond? Mine did. If yours don’t, you can try “busy board xxxxx” then “release board xxxxx”. That always works for me. If it still doesn’t work, Avaya would probably recommend pulling the board and re-seating it. There are a bunch of test procedures though. I assume performing a busy/release would Abort if you try it while the firmware is loading, but I don’t want to try. Let me know if you do it.

Summary

That’s it. The first time is scary, then it gets easier. Especially since this is done so infrequently that, as usual I start to forget the exact procedures. Good luck all and let me know how it goes. Thanks as always, Roger.


How to unlock a locked Avaya CM / SAT login

Every once in a while, your login may lock out. And if you use just one, or if you have some scripts using one, you might not want to wait for the account to unlock automatically (hopefully it does).

login as: telecom

This system is restricted solely to authorized users for legitimate business 
purposes only. The actual or attempted unauthorized access, use or modifications 
of this system is strictly prohibited. Unauthorized users are subject to company 
disciplinary procedures and or criminal and civil penalties under state, federal 
or other applicable domestic and foreign laws.

The use of this system may be monitored and recorded for administrative and 
security reasons. Anyone accessing this system expressly consents to such 
monitoring and recording, and is advised that if it reveals possible evidence of 
criminal activity, the evidence of such activity may be provided to law 
enforcement officials. All users must comply with all corporate instructions 
regarding the protection of information assets.
Using keyboard-interactive authentication.
Your account is locked. Maximum amount of failed attempts was reached.
Password:

So here are three things that are totally obvious once you’ve done it once.

  1. Have another login handy. Create a second just-in-case. This is easy also, but not completely straightforward.
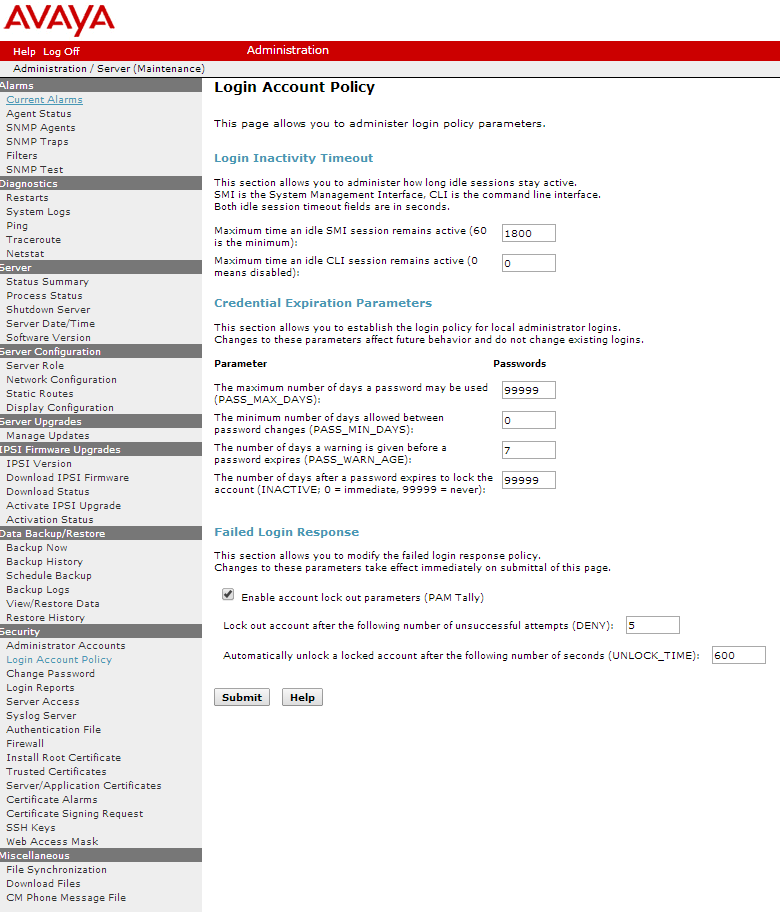
  2. Check your account lockout policy. This is done via the web interface at Security->Login Account Policy. You can set the number of failed accesses that trigger a lockout and the time the account is locked.
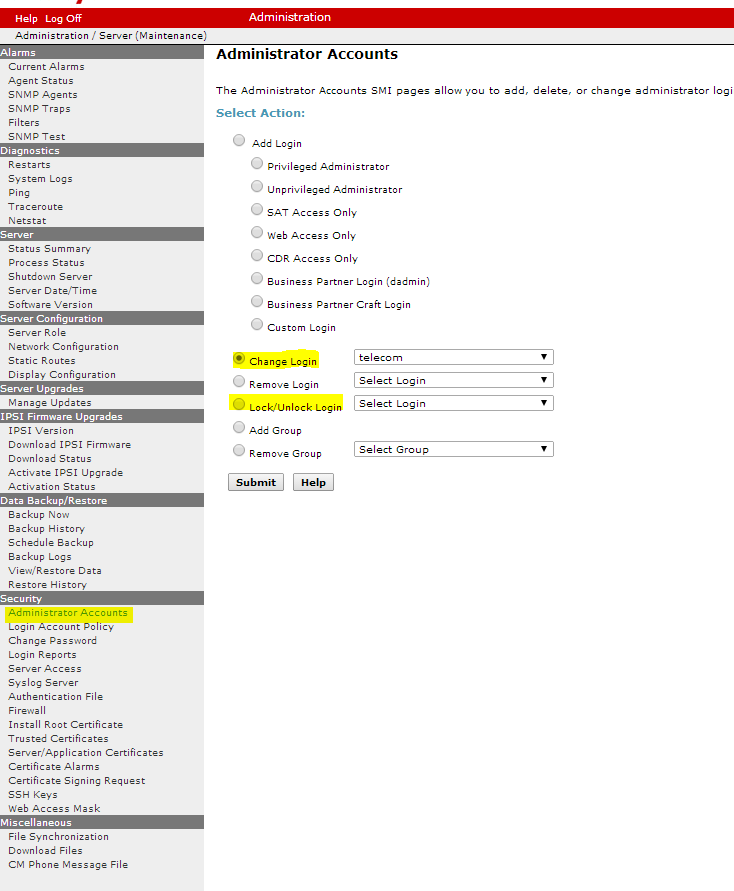
  3. You can manually unlock an account via the web interface at Security->Administrator Accounts. You can “Change Login” and uncheck the “Lock This Account” checkbox, or you can go to Security->Administrator Accounts and select the “Lock/Unlock Login” and it will toggle the locked status.

Here are a couple screenshots showing the lockout policy (at the end of the Login Account Policy screen) and the account lockout screens.

avaya-cm-account-policy

avaya-cm-unlock-login


Update – there’s another way to do this. From the SSH command line in your CM, simply type

userlock -u cust unlock

So… should I delete the rest of this post? Probably not. I suppose you may want to teach your helpdesk folks how to use the GUI rather than the terminal. So there you go.

How to “kick” an Avaya Local Survivable Processor without rebooting

I recently had an Avaya Local Survivable Processor (LSP) unregister. There was no indication why – it just went down. I was able to get to its web interface, and it had a minor alarm indicating that it was unregistered. I suppose I could have restarted the whole thing, but my tech talked me through this procedure, which worked great.

Please note that the LSP is typically registered and inactive. This LSP only activates if network connectivity is lost to the site. So if the home site is available through the WAN, it should look like this:

list survivable-processor
                             SURVIVABLE PROCESSORS
 Record Name/            Type         Reg Act         Translations      Net
 Number  IP Address                                   Updated           Rgn
  1     THE_LSP          LSP           y   n          2:02 12/30/2013   10
         10.2.10.110
        No V6 Entry

However, in my case it looked like this!

list survivable-processor
                             SURVIVABLE PROCESSORS
 Record Name/            Type         Reg Act         Translations      Net
 Number  IP Address                                   Updated           Rgn
  1     THE_LSP          LSP           n                                10
         10.2.10.110
        No V6 Entry

No entry to indicate the active status nor the last translation date. I was able to SSH to the LSP and I confirmed the LSP wasn’t active. The media gateway was still connected to my home site. The LSP could ping the home site. Somehow, the LSP was simply lost.

So I confirmed all CM processes were up with the “statapp” command:

telecom@pbx-cm01> statapp
Watchdog         9/ 9 UP SIMPLEX
TraceLogger      3/ 3 UP SIMPLEX
LicenseServer    2/ 2 UP SIMPLEX
SME              6/ 6 UP SIMPLEX
MasterAgent      1/ 1 UP SIMPLEX
MIB2Agent        1/ 1 UP SIMPLEX
MVSubAgent       1/ 1 UP SIMPLEX
LoadAgent        1/ 1 UP SIMPLEX
FPAgent          1/ 1 UP SIMPLEX
INADSAlarmAgent  1/ 1 UP SIMPLEX
GMM              4/ 4 UP SIMPLEX
SNMPManager      1/ 1 UP SIMPLEX
filesyncd        1/ 1 UP SIMPLEX
MCD              1/ 1 UP SIMPLEX
CommunicaMgr    86/86 UP SIMPLEX
telecom@pbx-cm01>

Sure enough, all processes were running fine. So I stopped CM with the command

stop -afcn

This will stop the processes listed above, refreshing as it goes. It’s pretty nice. When all processes have stopped, you can start CM again with

start -ac

Again, it refreshes the screen as the processes start back up. When it’s done, the LSP should re-register. It’s also a good idea to watch the home CM for this register event. About 30 seconds after the CM comes back, you should see it. In your home site, do a

list trace ras ip-a 10.2.10.110

while the LSP processes restarts.

Here is the register event

list trace ras ip-address 10.2.10.110

                                LIST TRACE

time            data

17:45:39 TRACE STARTED 12/30/2013 CM Release String cold-03.0.124.0-21166
17:46:37   rcv RRQ ext
                   endpt  [10.2.10.110]:1719
                   switch [10.1.10.110]:1719
17:46:52   rcv KARRQ ext
                   endpt  [10.2.10.110]:1719
                   switch [10.1.10.110]:1719
17:47:07   rcv KARRQ ext
                   endpt  [10.2.10.110]:1719
                   switch [10.1.10.110]:1719
17:47:20   RAS TRACE COMPLETE ext

Those KARRQ messages are the keepalives.

After this restart, the LSP was registered fine. No service impact at the site, as the LSP is inactive unless the WAN goes down. And much less scary (for me anyway) than restarting the whole LSP.

Happy New Year everyone!

Vintage Tele-Cost pricing guide for Los Angeles, CA

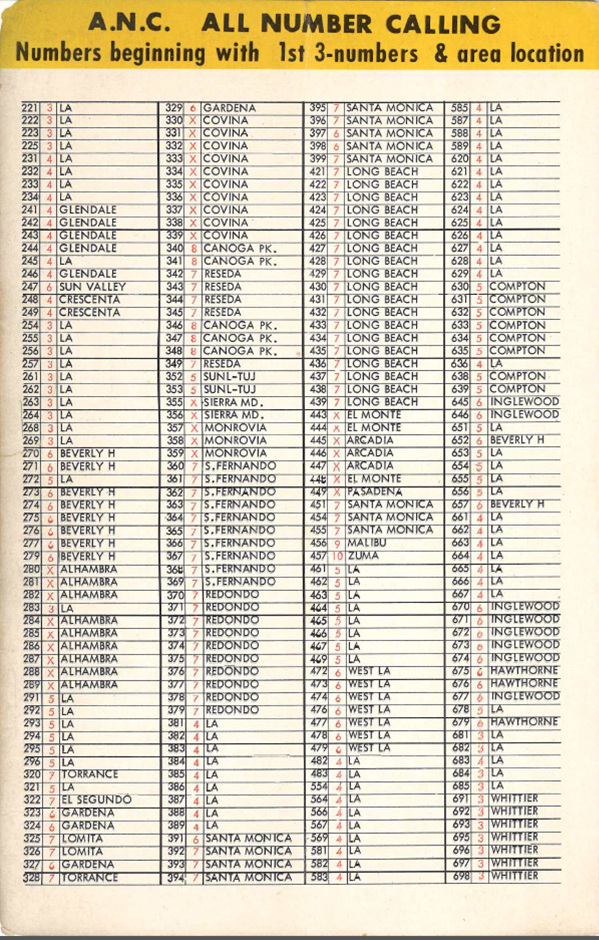
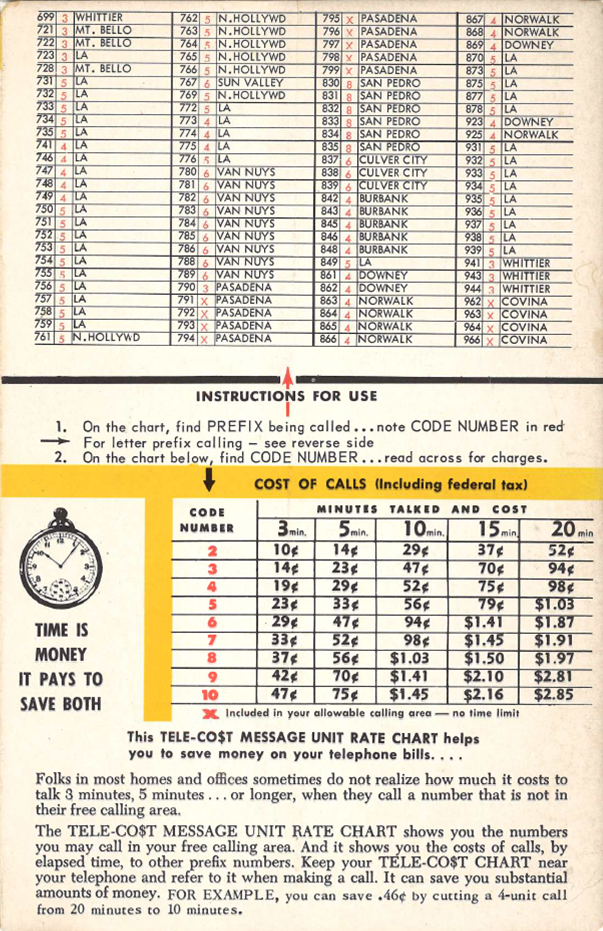
A friend of mine was cleaning out his father’s garage and found this pricing guide for Los Angeles, CA. Specifically the HIllcrest exchange 213-445, 446, and 447 exchanges. Back in the 1960s, the 213 area code was huge, and the farther you called, the more the call would cost. But the telephone company didn’t charge by miles, or by minutes. They priced the call by “Message Units”. Sometimes the cost of the call could surprise you, so this enterprising company came up with a pricing guide to tell you how many message units it would cost to call around your area. The information was readily available in your telephone book or asking your operator, but Tele-Cost (or TELE-CO$T) presented it in a nice chart to compare the cost of a 3-minute call vs. 5-minute and more. It looks like you could order one for any exchange, but since they were in Temple City, it may have just been a local thing to this area. I cannot find a reference to Tele-Cost anywhere else.

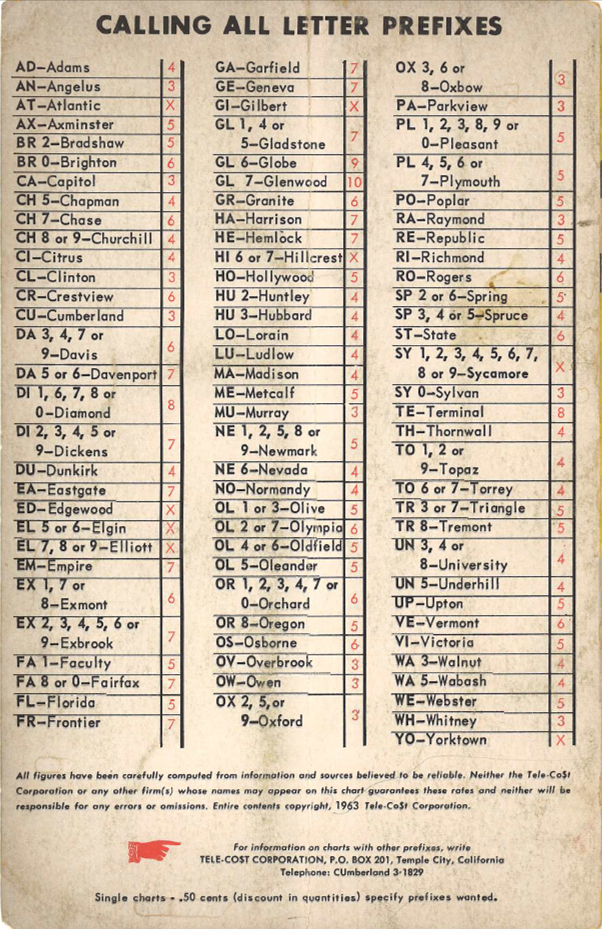
I have always known that exchange “names” were built from the first two numbers of the 7-digit telephone number. But I didn’t realize the Bell System would have multiple exchanges with the first two digits. For example, on the last page of this guide, there’s a list of the letter prefixes. DA-3, 4, 7, and 9 (prefixes 323, 324, 327, and 329) were called “DAvis”, but DA-5 and 6 (prefixes 325 and 326) were called “DAvenport”. I presume if you called the operator and asked for “DAvenport 3″, she might attempt to clarify that you have the right number, since DA-3 is really the”DAvis” exchange.

So this looks to be all of the assigned exchanges in the early 1960s in the 213 area code. Please also note the advertisement for Investors Savings and Loan Association. The telephone numbers for the ofices in Pasadena, Glendora, and East Pasadena are listed with the letter prefixes of SY 5, MU 1, and ED 5.

I would certainly love to hear from you if you have guides like this for your area, or if you stories about using exchange names when you were a kid.

tele-cost-page1

tele-cost-page2

tele-cost-page3

tele-cost-page4

How to integrate Avaya Session Manager 6.x with Microsoft Lync

In my last post, I described how to integrate Avaya Session Manager with Asterisk. I originally hacked away at that because I figured it would be a great way to eventually integrate with Microsoft Lync. Sure enough, my Exchange guy asked me if we could integrate Avaya and Lync so I simply followed my own instructions replacing “Asterisk” with “Lync Mediation Server” it came up first try. On the Lync side, just call the Avaya a VoIP carrier. And use media bypass whenever possible. Works great for us! Right-click a contact and select ‘dial’. It’ll dial out the PSTN. This is basic integration. What is interesting is it brings up a whole new level of questions. What do people mean by “Lync Integration”?

  1. Do you want to use your PC as the phone, or control your desk phone?
  2. Do you want to support inbound calls to your PC, desk phone, or both?
  3. Do you expect to be able to transfer calls between your PC and desk phon?
  4. Do you expect common lamping? I.e. Incoming call rings on my deskphone (lamp slow flashes), I pick it up (lamp solid), put it on hold (lamp fast flash), take it on my PC (lamp should go solid again)
  5. Do you expect your call log to keep up with both PC and deskphone?
  6. If you have separate calls up on both PC and desk, do you want to conference them together?

Obviously there’s a lot more to “integration” than simply making calls between Lync and Avaya. I’ll be working on some tricks with EC500 to make some of these work. What type of Lync integration are your managers and users want?

How to integrate Avaya Communication Manager and Session Manager 6.1 with Asterisk

As with most technical documents of this type, I wrote this because I could not find this information no matter how many Google searches I tried. There’s information about connecting Avaya Communication Manager directly with Asterisk using the H.323 channel drivers, there’s information regarding integration with the Avaya SIP Enablement Server, and I did find some information about some older versions of System Manager.

However, even the information I did see was a simple lab assignment. There was no information on actually using the new integration to do cool things. Some of you may have been tasked with integrating the Avaya PBX with Microsoft Lync. This tutorial provides a great proof-of-concept for Lync integration. We can test everything with Asterisk and it all in the telecom sandbox at your company.

This tutorial is for those of you who already have an Avaya Communication Manager and one or more Session Managers already set up – probably because you’re using Modular Messaging 6.x. Therefore, you have all the ingredients you need to add Asterisk to the mix.

Okay, so let’s assume your Communication Manager is already connected to Session Manager. Often this is the case due to the fact that Modular Messaging is now SIP based and uses Session Manager to connect to Communication Manager. I wanted to connect my Avaya Communication Manager to an Asterisk system. To do so, I need to know a few things about my existing infrastructure. You may already know these things about your PBX. If so, skim this part and skip to “Build the Route to Asterisk”

Part 1 – Confirming the current integration

So how is your Communication Manager connected to Session Manager? Let’s follow the rabbit:

First, look at the pilot number for voicemail, you’ll probably see that it’s a hunt group pilot number. Let’s say your voicemail pilot extension is 2000:

list usage extension 2000
                             LIST USAGE REPORT
Used By
Hunt Group           Group Number         5                      Group Ext

Now display that hunt group

display hunt-group 5                                            Page   2 of  60
                                  HUNT GROUP

                      Message Center: sip-adjunct

     Voice Mail Number        Voice Mail Handle         Routing Digits
                                                 (e.g., AAR/ARS Access Code)
     3992000                  sipmm-la                  801

This pilot number dials the AAR feature code, then 3992000. Now list aar:

list aar analysis                                                      Page   1
                           AAR DIGIT ANALYSIS REPORT
                            Location:  all
               Dialed            Total        Route    Call      Node
               String          Min    Max    Pattern   Type     Number
         1010                   4      4      13       aar
         14                     6      6      40       aar
         3990022                7      7      29       aar
         3992000                7      7      92       aar
         4010                   4      4      19       aar
         4099                   4      4      44       aar

And you can see that 3992000 goes to route pattern 92. Now look at route 92

display route-pattern 92                                        Page   1 of   3
                    Pattern Number: 92  Pattern Name: MM -LA
                             SCCAN? n     Secure SIP? n
    Grp FRL NPA Pfx Hop Toll No.  Inserted                             DCS/ IXC
    No          Mrk Lmt List Del  Digits                               QSIG
                             Dgts                                      Intw
 1: 91   0                    3                                         n   user
 2: 92   0                    3                                         n   user
 3: 93   0                    3                                         n   user
 4:                                                                     n   user
 5:                                                                     n   user
 6:                                                                     n   user

In my case, I have three Session Managers. I just care about the first one for now. So note that the first trunk group is 91. Now display trunk group 91:

display trunk-group 91                                          Page   1 of  21
                                TRUNK GROUP

Group Number: 91                   Group Type: sip           CDR Reports: y
  Group Name: MM SIP to LA                COR: 22       TN: 1        TAC: 815
   Direction: two-way        Outgoing Display? n
 Dial Access? n                                   Night Service:
Queue Length: 0
Service Type: tie                   Auth Code? n
                                              Member Assignment Method: auto
                                                       Signaling Group: 91
                                                     Number of Members: 96

And note that this trunk group uses signaling group 91. Now display signaling group 91:

display signaling-group 91 
                                SIGNALING GROUP

 Group Number: 299            Group Type: sip
  IMS Enabled? n        Transport Method: tls
        Q-SIP? n                                             SIP Enabled LSP? n
     IP Video? n                                   Enforce SIPS URI for SRTP? y
  Peer Detection Enabled? y  Peer Server: SM

   Near-end Node Name: procr                 Far-end Node Name: sipmm-la
 Near-end Listen Port: 5061                Far-end Listen Port: 5061
                                        Far-end Network Region: 5

Far-end Domain: corp.abc.com
                                             Bypass If IP Threshold Exceeded? n
Incoming Dialog Loopbacks: eliminate                  RFC 3389 Comfort Noise? n
         DTMF over IP: rtp-payload            Direct IP-IP Audio Connections? y
Session Establishment Timer(min): 3                     IP Audio Hairpinning? n
         Enable Layer 3 Test? y                   Initial IP-IP Direct Media? n
H.323 Station Outgoing Direct Media? n            Alternate Route Timer(sec): 6

And note that this signaling group connects the Communication Manager main processor (procr) to a node name called sipmm-la. Now list node-names:

list node-names all                                                    Page   4

                        NODE NAMES

Type     Name              IP Address
IP       cm-oc01p          10.5.20.131
IP       default           0.0.0.0
IP       iolan-la          10.2.4.21
IP       medpro-la1        10.2.4.22
IP       medpro-la2        10.2.4.23
IP       medpro-la3        10.2.4.24
IP       medpro-la4        10.2.4.25
IP       medpro-ny1        10.7.4.26
IP       medpro-ny2        10.7.4.27
IP       medpro-oc1        10.5.20.51
IP       medpro-oc2        10.5.20.52
IP       procr             10.2.20.20
IP       procr6            ::
IP       sipmm-la          10.5.20.139

And note that the node name is IP address 10.5.20.139. So in a nutshell, when I dial the voicemail pilot number, the call gets routed to my local session manager 10.5.20.139. That’s pretty much all we needed to know from the Communication Manager point of view.

Part 2 – Building the Route to Asterisk via Session Manager

What we really want is to set up a new route with new extensions between Communication Manager and Session Manager. Next we’ll configure Session Manager to understand a new number range and route it over to Asterisk.

In the case of a single pilot number, I could duplicate the hunt group method that is already set up. However, for more flexibility, I wanted a range of numbers to route to Asterisk. Or even if I do want to point individual numbers, I don’t want to create hunt groups for each one – I just want the number to route over to Asterisk through AAR routing.

So in my case, I had a spare DID number range ending in 44xx that I wanted to send over to Asterisk. So in CM, any four-digit number starting with 44 should go to Session Manager. Note that my route pattern 92 above deletes three digits. I don’t want to delete the first three digits of my 44xx extensions, so I will create a new route pattern that points to the same 91 trunk group. In my case, I used 90:

display route-pattern 90                                        Page   1 of   3
                    Pattern Number: 90  Pattern Name: SIP to SM
                             SCCAN? n     Secure SIP? n
    Grp FRL NPA Pfx Hop Toll No.  Inserted                             DCS/ IXC
    No          Mrk Lmt List Del  Digits                               QSIG
                             Dgts                                      Intw
 1: 91   0                                                              n   use

Now I want to point an entire internal number range to this route using AAR. So the first thing I need to do is edit my uniform dial plan so CM will use AAR routing when I dial this range:

list uniform-dialplan start 41                                         Page   2
                      UNIFORM DIAL PLAN TABLE

 Matching Pattern   Len   Del   Insert Digits   Net    Conv   Node Num

 4129                4     0                    ext     n
 4152                4     0                    ext     n
 4156                4     0                    ext     n
 4163                4     0                    ext     n
 4171                4     0                    ext     n
 4232                4     0                    ext     n
 44                  4     0                    aar     n
 4541                4     0                    ext     n
 4552                4     4      2089          ext     n
 4583                4     0                    ext     n
 4596                4     0                    ext     n
 4598                4     0                    ext     n

Fortunately CM is very forgiving with aar vs. ext. If I can digress for one screenshot, note that my dialplan analysis table defines all four-digit patterns that begin with 4 as extensions. However, I am able to override this in the uniform dialplan table and point these to aar in the table entry above.

display dialplan analysis                                       Page   1 of  12
                             DIAL PLAN ANALYSIS TABLE
                                   Location: all            Percent Full: 5

    Dialed   Total  Call     Dialed   Total  Call     Dialed   Total  Call
    String   Length Type     String   Length Type     String   Length Type
   0           4   ext      37          4   ext      77          4   ext
   20          4   ext      4           4   ext      78          4   ext
   21          6   ext      5           4   ext      79          4   ext
   22          6   ext      51          6   ext      888         3   fac
   23          6   ext      64          4   ext      
   24          6   ext      65          4   ext      
   25          6   ext      66          4   ext      
   26          6   ext      67          4   ext      
   27          4   ext      72          4   ext      
   29          6   ext      73          4   ext

So back to CM routing. Now that I have defined 44xx to point to the aar table, let’s create the aar entry we need to send this to Session Manager:

list aar analysis                                                      Page   1
                           AAR DIGIT ANALYSIS REPORT
                            Location:  all
               Dialed            Total        Route    Call      Node
               String          Min    Max    Pattern   Type     Number
         1010                   4      4      1        aar
         14                     6      6      400      aar
         3990022                7      7      298      aar
         3992000                7      7      299      aar
         4010                   4      4      11       aar
         4099                   4      4      44       aar
         44                     4      4      90       aar
         63xx                   4      4      25       aar
         74                     4      4      24       aar
         750                    6      6      299      aar

Now any four digit numbers starting with 44 will route (via route pattern 90) over to my session manager. Next, we need to configure session manager to route these to Asterisk!

Part 3 – Configuring Session Manager via System Manager

Now, I don’t know your experience with System Manager, but it seems that if I turn my back for a few weeks, the Admin password stops working and I have to reset it via SSH. Hopefully you have better luck than I do.

Major Gotcha: The first time I worked on this routing in System Manager, I just couldn’t get the calls to work. They would die in Session Manager with extremely unhelpful errors. After some troubleshooting, I discovered my changes weren’t synchronizing between System Manager and Session Manager. I had to go into Home->Replication and “repair” the replica group. I have done this several times since then and all of my calls during replication route fine. I don’t think it is service-affecting (with my configuration anyway). Your results may vary. Be careful.

avaya-smgr-replica1


I’ve worked on PBXs for a long time. Naturally, it can sometimes take a while to get comfortable with the GUI or command line of new systems. System Manager was tough for me. It’s such an abstraction from the actual routing engine (Session Manager) and I don’t get a chance to use a command line. I guess web interfaces drive me crazy for that reason – they’re a front-end to the actual magic, and I like to be closer to the soul of a PBX.

Enough rant – the actual configuration all takes place within Home->Routing. I just went in order down the list on the left. First, I configured a location called “LA-Asterisk”.

avaya-location-asterisk


avaya-location-asterisk-details


Next I created an Adaptation also called LA-Asterisk. Note in the screenshot below, there is a 4-digit extension pattern defined. We will do this later.

avaya-adaptation1 avaya-adaptation-asterisk

Next, create a SIP Entity. This is where you define your Asterisk server

avaya-sip-entity1


Next, create the Entity Link to “connect” your Asterisk and Session Manager together:

avaya-sip-entity-link


In my case, I went for simple UDP connectivity. Next I create the Routing Policy for Asterisk:

avaya-routing-policy1


Don’t worry about dial patterns or regular expressions on this screen. Just set up a SIP Entity and Time of Day and commit.

Then the Dial Pattern:

avaya-dialpattern-asterisk


Note in my case, the PBX is sending the full E.164 number to Session Manager. Well, this isn’t entirely accurate. To digress again, the PBX is sending the regular extension, but the Adaptation for Communication Manager defines several digit conversion rules to convert these to E.164 numbers. This allows for a very flexible system within Session Manager. As a result of this digit conversion, the internal routing of the Session Manager uses the E.164 numbers and this is what you see when you trace. Here are my Adaptation rules:

avaya-adaptation-digit-conversion


I’ve erased the DID numbers there – I’m not much of a photo editor. You can see how the various extension ranges and lengths translate into E.164. Note that four-digit non-DIDs are translated to +1000000xxxx. This is how Avaya set up this site and I assume the best practice. I work at another site (set up by an Avaya business partner) that was not normalized to E.164 and it’s been kind of a pain to manage as we’ve added DIDs and extensions.

So back to Communication Manager routing: do you remember way back when I mentioned you could use the “hunt group” routing to send calls to Asterisk? I created a hunt group in CM that looks like this:

display hunt-group 9                                            Page   1 of  60
                                  HUNT GROUP

            Group Number: 9                                ACD? n
              Group Name: Asterisk                       Queue? n
         Group Extension: 2022                          Vector? n
              Group Type: ucd-mia                Coverage Path:
                      TN: 1          Night Service Destination:
                     COR: 21                   MM Early Answer? n
           Security Code:               Local Agent Preference? n
 ISDN/SIP Caller Display: mbr-name

display hunt-group 9                                            Page   2 of  60
                                  HUNT GROUP

                      Message Center: sip-adjunct

     Voice Mail Number        Voice Mail Handle         Routing Digits
                                                 (e.g., AAR/ARS Access Code)
     3992022                  ast-la                    888

This hunt group will send calls to 2022 over to Session Manager with a dial pattern of ast-la. You can then create a regular expression in System Manager to match this pattern:
avaya-regular-expression

Why would you want to do this? Well, this is how the Avaya technicians originally set up the routing to Modular Messaging. I suspect it allows the SIP header to retain the original dialed number as it is passed across. There’s a “diversion” header in the SIP invite, and this is how the originally-dialed number gets to Modular Messaging. I happened to set this up in a desperate attempt to get Session Manager to route for me. When I use the traceSM utility in Session Manager, I noticed that Session Manager was not trying to find a match for this pattern. This is when I discovered that the replication wasn’t working between System Manager and Session Manager. Once I fixed the replication, the rest of the routing worked and I left this in place rather than pull it all out. More on traceSM later.

---------------------------------------------------------------------------------------------------------------
         cm01(.30)             192.168.204.39
                       SM100
---------------------------------------------------------------------------------------------------------------
16:03:51,290 |   Dial Pattern route parameters   | URI Domain: abc.com  Location: LA-MAIN-CM
16:03:51,290 |   Dial Pattern route parameters   | URI Domain: null  Location: LA-MAIN-CM
16:03:51,290 |     Trying Dial Pattern route     | Domain: null  Location: LA-MAIN-CM
16:03:51,290 |   Dial Pattern route parameters   | URI Domain: corp.abc.com  Location: null
16:03:51,290 |     Trying Dial Pattern route     | Domain: corp.abc.com  Location: null
16:03:51,290 |   Dial Pattern route parameters   | URI Domain: abc.com  Location: null
16:03:51,290 |   Dial Pattern route parameters   | URI Domain: null  Location: null
16:03:51,290 |     Trying Dial Pattern route     | Domain: null  Location: null
16:03:51,290 |  Request Regular Expression rout  | for: sip:ast-la@corp.abc.com
16:03:51,291 |  Trying Regular Expression route  | pattern: sipmm-ny.*  for: sip:ast-la@abc.corp
16:03:51,291 |  Trying Regular Expression route  | pattern: sipmm-la.*  for: sip:ast-la@abc.corp
16:03:51,291 |  Trying Regular Expression route  | pattern: sipmm-oc.*  for: sip:ast-la@abc.corp
16:03:51,291 |  Trying Regular Expression route  | pattern: ast-la.*  for: sip:ast-la@abc.corp
16:03:51,291 |  Trying Regular Expression route  | pattern: sipmm-ny.*  for: ast-la@corp.abc.com
16:03:51,291 |  Trying Regular Expression route  | pattern: sipmm-la.*  for: ast-la@corp.abc.com
16:03:51,291 |  Trying Regular Expression route  | pattern: sipmm-oc.*  for: ast-la@corp.abc.com
16:03:51,291 |  Trying Regular Expression route  | pattern: ast-la.*  for: ast-la@corp.abc.com
16:03:51,291 |     Regular Expression found      | pattern: ast-la.*  for: ast-la@corp.abc.com  RoutePolicyList
16:03:51,291 |            Route found            | for: sip:ast-la@corp.abc.com  SIPEntity: asterisk-la01p
16:03:51,291 |         Entity Link found         | SIPEntity: asterisk-la01p  EntityLink: sip-oc1->UDP, b
16:03:51,291 |     Entity Link to another SM     | To: sip-oc1  MyInstance: sip-la1
16:03:51,291 |         Entity Link found         | SIPEntity: sip-oc1  EntityLink: sip-la1->TLS, biD
16:03:51,291 |        Request Adaptation         | Adapter: LA-MAIN-CM
16:03:51,292 |     Applied egress Adaptation     | P-Asserted-Identity="Roger Ramjet" <sip:2135552245@abc.corp 16:03:51,292 |        Routing SIP request        | SipEntity: asterisk-la1  EntityLink: sip-oc01->UDP:50
16:03:51,292 |         Entity Link found         | SIPEntity: sip-oc1  EntityLink: sip-la1->TLS, biD
16:03:51,293 |  No hostname resolution required  | Routing to: sip: 10.5.20.139;transport=tls;lr;sm-routethru
16:03:51,294 |           |--INVITE-->|           | (8) T:ast-la F:+12135552245 U:ast-la P:terminating
16:03:51,342 |           |<--Trying--|           | (8) 100 Trying
16:03:52,419 |           |

Once you create a regular expression in System Manager, you should see an attempt to match it in traceSM. I wasn’t seeing my new patterns in this “Trying…” list. If you don’t see your patterns, it may be time to repair the replication.

Part 4 – Configure Asterisk to accept inbound calls from Communication Manager

Ok, so you finally have CM configured, and you think you have Session Manager/System Manager configured. Now for the last step. In my case, I was happy to finally get to Asterisk. Getting back to my rant about Session Manager, I like Asterisk because it’s completely command line and config files. This allows you to get very close to the inner workings of Asterisk.

Asterisk was a simple two step configuration: sip.conf and extensions.conf.

Just add these lines to /etc/asterisk/sip.conf

[avayaLA]
type=peer
qualify=yes
fromdomain=corp.abc.com
host=192.168.24.39
disallow=all
allow=ulaw
allow=g729
dtmfmode=rfc2833
canreinvite=yes

And add these lines to /etc/asterisk/extensions.conf. Note that we’re creating a context for our Avaya Session Manager and adding it to the default context. Later you can pull this out, but for now it provides a nice way to test incoming calls by sending them to the “congratulations” demo that came with Asterisk.

[avaya-la]
exten => ast-la,1,noop
exten => ast-la,n,goto(demo,1000,1)
exten => 4498,1,goto(demo,1000,1)
exten => 4499,1,meetme(4499,1)

[default]
;
; By default we include the demo.  In a production system, you
; probably don't want to have the demo there.
;
include => demo
include => internal
include => avaya-la

So now let’s test. We should have these things in place:

  1. Connectivity between Communication Manager and Session Manager
  2. Connectivity between Session Manager and Asterisk
  3. Routes built from Communication Manager through Session Manager to Asterisk

Now when I call a 44xx extension, the Communication Manager will send it via AAR to Asterisk. Let’s look at that call within Communication Manager:

list trace station 2245                                                Page   1
                                LIST TRACE
time            data
13:12:11 TRACE STARTED 03/19/2012 CM Release String cold-00.1.510.1-19100
13:12:13     active station      2245 cid 0x11c3
13:12:13     G711MU ss:off ps:20
             rgn:1 [172.25.114.8]:11394
             rgn:1 [172.25.24.124]:59628
13:12:15 SIP>INVITE sip:4498@corp.abc.com SIP/2.0
13:12:15     Call-ID: 801ecff7b275e11f7724f24def200
13:12:15     dial 4498 route:UDP|AAR
13:12:15     term trunk-group 91      cid 0x11c3
13:12:15     dial 4498 route:UDP|AAR
13:12:15     route-pattern  90 preference 1 location 1/ALL  cid 0x11c3
13:12:15     seize trunk-group 91 member 6    cid 0x11c3
13:12:15     Setup digits 4498
13:12:15     Calling Number & Name *12135552245 Roger Ramjet
13:12:15 SIP<SIP/2.0 100 Trying
13:12:15     Call-ID: 801ecff7b275e11f7724f24def200
13:12:15     Proceed trunk-group 91 member 6    cid 0x11c3
13:12:15 SIP<SIP/2.0 180 Ringing
13:12:15     Call-ID: 801ecff7b275e11f7724f24def200
13:12:15     Alert trunk-group 91 member 6    cid 0x11c3

We can see from this trace that the call to 4498 goes over route 90 to trunk group 91. Perfect. Now let’s watch Session Manager. If you haven’t had the chance, you can trace calls within Session Manager via a tool called traceSM. At first I wasn’t sure about it, but I’ve come to really like it. SSH into your session manager (the management interface, not the traffic interface) and login as ‘craft’. If you know your Avaya systems, you’ll know the default password. Then type ‘traceSM’. After a few seconds of loading the log file, you’ll be ready to trace.

If your system has a lot of traffic, you’ll probably want to filter your results. Type ‘f’ at the screen and filter by your test extension.

/----------------------------------------------------------------------\
|Filter Usage:                                                         |
|  -u   Filter calls that contain  in          |
|                   the 'From' or 'To' field.                          |
|  -i           Filter SIP messages from/to  address.                  |
|  -c      Filter based on the SIP 'Call-ID' header field.             |
|  -g = Filter SIP header field  for value .                           |
|  -or              Use a logical OR operator instead of the implicit  |
|                   AND when using multiple filter options.            |
|  -nr              Do not display REGISTER messages.                  |
|  -ns              Do not display SUBSCRIBE/NOTIFY messages.          |
|  -no              Do not display OPTIONS messages.                   |
|  -na              Do not display SM related messages.                |
|Filter examples:                                                      |
| To display a call to/from 3035556666 and not REGISTER messages:      |
|    -u 3035556666 -nr                                                 |
| To display SIP messages from/to 1.1.1.1 and 2.2.2.2:                 |
|    -i "1.1.1.1|2.2.2.2"                                              |
|                                                                      |
|Current Filter:                                                       |
|New Filter: -u 4498                         |
|                                                                      |
\----------------------------------------------------------------------/

Press enter and traceSM will re-process the log file. Then press ‘c’ to clear the results, then press ‘s’ to start the trace. Now when I re-dial extension 4498 and I can see the call pass through Session Manager:

---------------------------------------------------------------------------------------------------------------------------------
       172.25.204.30           172.25.14.131
                       SM100
---------------------------------------------------------------------------------------------------------------------------------
13:39:33,115 |--INVITE-->|           |           | (1) T:4498 F:+12135552245 U:4498 P:terminating
13:39:33,117 |<--Trying--|           |           | (1) 100 Trying
13:39:33,118 |      Remote host is trusted       | Trusted
13:39:33,118 |        Request Adaptation         | Adapter: LA-MAIN-CM
13:39:33,119 |    Applied ingress Adaptation     | Request-URI=sip:+12135554498@corp.abc.com, History-Info=<sip:+12135554498@corp.abc.com>;index=1,"4498" UDP, biDirId=null:5060
13:39:33,121 |        Request Adaptation         | Adapter: LA-MAIN-CM
13:39:33,121 |     Applied egress Adaptation     | P-Asserted-Identity="Roger Ramjet" <sip:2135552245@corp.abc.com>, Request-URI=sip:4498@corp.abc.com;rout
13:39:33,121 |        Routing SIP request        | SipEntity: asterisk-la01p  EntityLink: sm-sip-la01p->UDP:5060
13:39:33,123 |  No hostname resolution required  | Routing to: sip:172.25.4.231;lr;phase=terminating
13:39:33,124 |           |--INVITE-->|           | (1) T:4498 F:+12135552245 U:4498 P:terminating
13:39:33,195 |           |<--Trying--|           | (1) 100 Trying
13:39:33,209 |           |<--Ringing-|           | (1) 180 Ringing
13:39:33,211 |        Request Adaptation         | Adapter: LA-MAIN-CM
13:39:33,212 |<--Ringing-|           |           | (1) 180 Ringing 13:39:34,455 |--CANCEL-->|           |           | (1) sip:4498@corp.abc.com
13:39:34,455 ||           | (1) sip:4498@corp.abc.com
13:39:34,496 |           ||           | (1) sip:4498@corp.abc.com
13:39:34,499 |<--Request-|           |           | (1) 487 Request Terminated 13:39:34,548 |----ACK--->|           |           | (1) sip:4498@corp.abc.com

You can see the SIP INVITE from Communication Manager. You can see Session Manager process it using the various rules in the routing engine, and you can see the INVITE passed along to Asterisk. You can use the arrow keys to highlight the INVITE and press enter to see the details:

/--------------------------------------------------------------------------------\
|INVITE sip:4498@corp.abc.com;routeinfo=0-0 SIP/2.0                              |
|Record-Route: <sip:192.168.214.8:15060;lr;sap=865602204*1*016asm-callprocessing | 
|.sar634103744~1332189573117~-1715763735~1>                                      |
|From: "Roger Ramjet" <sip:+12135552245@corp.abc.com>;tag=0f617ceb675e1123764f2  |
|4def200                                                                         |
|To: <sip:4498@corp.abc.com>                                                     |
|Call-ID: 0f617ceb675e1124764f24def200                                           |
|CSeq: 1 INVITE                                                                  |
|Via: SIP/2.0/UDP 192.168.24.8:15070;branch=z9hG4bKC0A8CC2608E7B337012365250     |
|Via: SIP/2.0/UDP 192.168.24.8:15070;branch=z9hG4bKC0A8CC2608E7B337112365248     |
|Via: SIP/2.0/UDP 192.168.24.8:15070;branch=z9hG4bKC0A8CC2608E7B337112365247     |
|Via: SIP/2.0/TLS 192.168.24.9;branch=z9hG4bK0f617ceb675e1125764f24def200-AP;ft  |
|=23826                                                                          |
|Via: SIP/2.0/TLS 172.25.24.30;branch=z9hG4bK0f617ceb675e1125764f24def200        |
|Supported: 100rel,histinfo,join,replaces,sdp-anat,timer                         |
|Allow: INVITE,ACK,OPTIONS,BYE,CANCEL,SUBSCRIBE,NOTIFY,REFER,INFO,PRACK,PUBLISH  |
|User-Agent:  Avaya CM/R016x.00.1.510.1 AVAYA-SM-6.1.1.0.611023                  |
|Contact: "Roger Ramjet" <sip:+12135552245@172.25.24.30:5061;transport=tls>      |
|Alert-Info: <cid:internal@corp.abc.com>;avaya-cm-alert-type=internal            |
|Min-SE: 1200                                                                    |
|Record-Route: <sip:559ae004@192.168.24.39;transport=tls;lr>                     |
|Record-Route: <sip:172.25.24.30:5061;transport=tls;lr>                          |
|Session-Expires: 1200;refresher=uac                                             |
|P-Charging-Vector: icid-value="AAS:5279-ce17f6001e175b6244f7622f2de"            |
|Content-Type: application/sdp                                                   |
|Content-Length: 210                                                             |
|P-Asserted-Identity: "Roger Ramjet" <sip:2135552245@corp.abc.com>               |
|History-Info: <sip:2135554498@corp.abc.com>;index=1,"4498" <sip:2135554498@corp.abc.com>;index=1.1                                                              |
|Route: <sip:192.168.204.39;lr>                                                  |
|Route: <sip:172.25.4.31;lr;phase=terminating>                                   |
|P-AV-Transport: AP;fe=172.25.24.30:34534;ne=192.168.24.39:5061;tt=TLS;th;timer  |
|B=4                                                                             |
|P-Location: SM;origlocname="LA-MAIN-CM";termlocname="LA-Asterisk"               |
|Max-Forwards: 68                                                                |
|                                                                                |
|v=0                                                                             |
|o=- 1332189580 1 IN IP4 172.25.24.30                                            |
|s=-                                                                             |
|c=IN IP4 172.25.24.54                                                           |
|b=AS:64                                                                         |
|t=0 0                                                                           |
|a=avf:avc=n prio=n                                                              |
|a=csup:avf-v0                                                                   |
|m=audio 65044 RTP/AVP 0 127                                                     |
|a=rtpmap:0 PCMU/8000                                                            |
|a=rtpmap:127 telephone-event/8000                                               |
\--------------------------------------------------------------------------------/

This confirms that your dial request to 4498 is passing through the Session Manager over to Asterisk. Now let’s look at Asterisk:

exten => 4498,1,goto(demo,1000,1)

Because our extensions.conf file contains the line above, the calls that come in should go to the Asterisk demo application. Let’s watch from the CLI when I call 4498 again:

localhost*CLI>
  == Using SIP RTP CoS mark 5
    -- Executing [4498@default:1] Goto("SIP/avayaLA-00000037", "demo,1000,1") in new stack
    -- Goto (demo,1000,1)
    -- Executing [1000@demo:1] Goto("SIP/avayaLA-00000037", "default,s,1") in new stack
    -- Goto (default,s,1)
    -- Executing [s@default:1] Wait("SIP/avayaLA-00000037", "1") in new stack
    -- Executing [s@default:2] Answer("SIP/avayaLA-00000037", "") in new stack
    -- Executing [s@default:3] Set("SIP/avayaLA-00000037", "TIMEOUT(digit)=5") in new stack
    -- Digit timeout set to 5.000
    -- Executing [s@default:4] Set("SIP/avayaLA-00000037", "TIMEOUT(response)=10") in new stack
    -- Response timeout set to 10.000
    -- Executing [s@default:5] BackGround("SIP/avayaLA-00000037", "demo-congrats") in new stack
    -- <SIP/avayaWLA-00000037> Playing 'demo-congrats.slin' (language 'en')
  == Spawn extension (default, s, 5) exited non-zero on 'SIP/avayaWLA-00000037'
localhost*CLI>

And if you could hear what I hear, you’d enjoy Allison Smith’s congratulations message also! We have inbound calls to Asterisk.

Part 5 – Configure Asterisk to send outbound calls to Communication Manager

This one is a little easier. To send internal calls to Avaya, just create an extension match in extensions.conf to match your internal number ranges. However, don’t forget that you are probably sending some numbers from Communication Manager to Asterisk. Be sure not to send these number ranges back to Communication Manager! In my case, Communication Manager is sending 44xx to Asterisk so I make sure I keep those numbers internal to Asterisk by dialing any registered SIP phones (more on this later).

[losangeles]
;these are LA extensions registered through softphones
exten => _44XX,1,Dial(SIP/${EXTEN}) ; these stay internal to Asterisk
exten => _91XXXXXXXXXX,1,dial(SIP/${EXTEN}@avayaLA) ; external – leave the 9 in place
exten => _[245]XXX,1,dial(SIP/${EXTEN}@avayaLA) ; 4 digits starting with 0, 4, or 5

To test this, you can issue an ‘originate’ command right from the Asterisk CLI.

localhost*CLI> originate SIP/2245@avayaWLA extension 1000
  == Using SIP RTP CoS mark 5
    -- Executing [1000@default:1] Goto("SIP/avayaLA-00000049", "default,s,1") in new stack
    -- Goto (default,s,1)
    -- Executing [s@default:1] Wait("SIP/avayaLA-00000049", "1") in new stack
    -- Executing [s@default:2] Answer("SIP/avayaLA-00000049", "") in new stack
    -- Executing [s@default:3] Set("SIP/avayaLA-00000049", "TIMEOUT(digit)=5") in new stack
    -- Digit timeout set to 5.000
    -- Executing [s@default:4] Set("SIP/avayaLA-00000049", "TIMEOUT(response)=10") in new stack
    -- Response timeout set to 10.000
    -- Executing [s@default:5] BackGround("SIP/avayaLA-00000049", "demo-congrats") in new stack
    -- <SIP/avayaWLA-00000049> Playing 'demo-congrats.slin' (language 'en')
  == Spawn extension (default, s, 5) exited non-zero on 'SIP/avayaWLA-00000049'
localhost*CLI>

The command above causes Asterisk to launch a call to 2245 through the avayaLA peer and send the call to extension 1000. You should get a call and when you answer, you’ll hear the demo. Likewise, external calls should include the ‘9’ when sent to Communication Manager. Your system will probably pass this through Session Manager to Communication Manager just fine since Modular Messaging needs to dial out sometimes (for find-me/follow-me features).

So that’s it! You now have an Avaya Communication Manager sending and receiving calls to Asterisk via Session Manager! This is a great proof-of-concept for you to start your Lync integration. I’ll write up a separate article for Lync. There’s an amazing amount of politics involved in a Lync project. I’d love to hear from you about it.