Flowchart of Avaya Communication Manager Routing

Click Here for the flowchart PDFs

One might argue that telephone systems do only one thing. They route calls. In the process they turn lamps on and off, and they make telephones buzz and beep. But the only point is to route voices from point A to point B.

If you’ve been working with Avaya Communication Manager for a while, you have been exposed to AAR and ARS routing. And you hopefully have a fair grasp of how it all fits together. But there are a whole lot of decisions that are made when routing outbound calls. And if you’re new to Avaya, it might seem overwhelming to troubleshoot routing issues. So here are four pages of flowcharts that, based on my experience, are the most common configuration issues you’ll see when managing your telephone system. Click Here for the flowchart PDFs

Page 1 is a flowchart of the digit collection. This is what the CM does to collect the dialed digits, translate them as necessary, and select a network (AAR vs. ARS). Digits can be translated many times and re-pointed to different networks. Once this process is complete, the logic continues to page 2.

avaya_call_routing_flowchart-page_1_of_4

Page 2 is the process of using the final dialed digits (and station’s location) to select a route and a trunk group. There are many location and facilities restriction level checks here. And there is even more digit translation that can take place during this process. Once a trunk is selected and the call delivered, this may not be the end of it. Look Ahead Routing may pull the call back and try again.

avaya_call_routing_flowchart-page_2_of_4

Those two pages compose the primary routing logic that you will use in your typical troubleshooting. However, many decisions are based upon the calling party’s location. It may be obvious to you how the CM know’s the station’s location. But if things get strange, you can see how the CM associates a station to a location on page 3.

avaya_call_routing_flowchart-page_3_of_4

And lastly, there is one major headache associated with the “Prefix Mark” in a route pattern. Prior to 1995, there were many, many dialing rules associated with seven digit dialing, one plus seven digits, ten digits, etc. I remember living in a small town in the California Bay Area, and to dial Concord (over the hill), I had to dial 1+seven digits. Then when the area code 415 was split in to 415/510, we could dial 10 digits between them. Unfortunately, if you dialed 1+10 digits, it would be charged as a long distance call. All this went away in 1995 when the North America Numbering Plan was implemented. It is much easier to route calls now. But there is still the dreaded “Prefix Mark” that may still be in your routes. This causes havoc with the dialed-digits that are sent to your carrier. Page 4 is a summary of how this prefix mark works.

avaya_call_routing_flowchart-page_4_of_4

Please note there are two extremely important troubleshooting tools when dealing with Avaya routing. One, is the ‘list ars route-chosen’ and ‘list aar route chosen’ commands, and the other is the ‘list trace station’ and ‘list trace tac’ commands. If you use Avaya Site Administrator, you will not be able to use the ‘list trace’ command. I encourage you to use telnet or ssh in your day-to-day management of your PBX so you can use these commands when necessary. It may not sound like much, but being able to list trace at a moment’s notice is very helpful.

I will save the “list aar/ars route-chosen” and “list trace station/tac” for another posting. There’s a lot of information available in these commands.

Please let me know if you find these flowcharts helpful. Also, if you find any typos please let me know. Please keep in mind there are many more routing decisions the CM makes that are not in these flowcharts. If your CM uses other routing (for example tenants or time-of-day) and you think I should incorporate them into these flowcharts, please let me know! Happy routing everyone. This is really the core of any PBX, so I personally really enjoy working with routing.

Roger

Click Here for the flowchart PDFs

PPM / Feature Buttons not working on Avaya SIP phones

This one was very frustrating. My SIP phones could log into the SBC-E and got dialtone fine, but wouldn’t pull PPM. The Avaya One-X Communicator for iPhone could do it though. Whaaaaa??

I have my phones configured to pull a config file from a web server – it’s the only manual setting required in the phone. All other settings are in the config file on the web. Well, it turns out that the phone didn’t like the SET CONFIG_SERVER w.x.y.z parameter. Once I removed that, then PPM flowed just fine.

By the way, if you have trouble with feature buttons, the other issue I had was the entity link between Session Manager and the SBC. If your’re using TLS connections between the phone and the SBC, then you also need to use TLS on the entity link between the SBC and the Session Manager, and the Session Manager to the Communication Manager. In other words, all connections from the endpoint to the CM need to be TLS. If any of them go back to unencrypted TCP or UDP, then the PPM breaks. At least it did for me!

Unable to log into the Avaya Utility Server as cust or admin on System Platform

I recently had a strange issue with my utility servers. I have four of them on System Platform on the S8300D servers. But I was unable to log into any of them as cust nor admin. I could log into my standalone utility servers, but not the ones on system platform.

It turns our the ldap config was corrupted on the servers and Avaya needed to fix it. Once complete, the tech sent me a nice summary:

If this were to happen again, you can verify if the account works by attempting login to SSH of Dom0 or Cdom or webconsole of Cdom.  If it works there, then we know that LDAP configuration is corrupted and needs to be corrected.  If it happens again, have a ticket open stating that LDAP is corrupted on VUS and that /etc/ldap.conf and /etc/nsswitch.conf need to be fixed.

How to reboot the Avaya S8300D from the G-Series gateway

I recently had a problem logging into System Platform. I could not connect to the CDOM via the web, nor SSH into DOM0. Fortunately, there is a way to reboot the S8300D from the gateway itself. Log into the gateway as root, then type “configure” to get to the config menu. Then simply type “reset mm v1”, which will reboot the media module in slot V1. Confirm, and the card will reboot. From my understanding, it will cleanly shut down each VM and reboot.

As always, it will take just long enough for you to panic, plus 45 seconds or so.


TraceSM is already running – how to stop it

In the new version of Session Manager (6.3 and above), the traceSM process is supposed to timeout and stop on its own. However, I was just trying to run it today and got this error

[cust@la-sessionmanager ~]$ traceSM
ERROR: traceSM is already running. Only one instance is allowed.

Uh oh. I don’t know the root password so I cannot kill it. However, Avaya thought of this for me. Just run traceSM with the -k switch and all is well:

traceSM -k

This kills the old process and runs a new instance for me. Just another thing that sounds simple once you know it.

no VNS resource administered

Here’s one of those times when I’m in the Avaya Communication Manager and I get an error. Happens to me all the time. What do you do when you get an error? Google it? Me too!

In my case, I wanted to see if I could get a report of packet loss from one of my network regions. Sure enough, there’s a packet loss report. You can perform this “list measurements” command:

list measurements ip voice-stats hourly pktloss 6


No VNS resource administered
Command:

Hmm, no VNS resource. So I type that into google with quotes and there are no results! How can there be no results? I opened a ticket with Avaya and their expert systems didn’t return anything either. Later I was looking through some documentation and I recalled that you sometimes have to tell Communication Manager what you want to measure. Sure enough, if you “change measured selection network region”, you can add the network regions you want monitored.

Now when I type “list measurements ip voice-stats hourly pkloss 6” I get an empty report. Hopefully tomorrow I’ll have some stats. Do you ever wish you could automate this report? More on that later.

Thanks all!


How to build a T1/PRI from scratch on Avaya Communication Manager

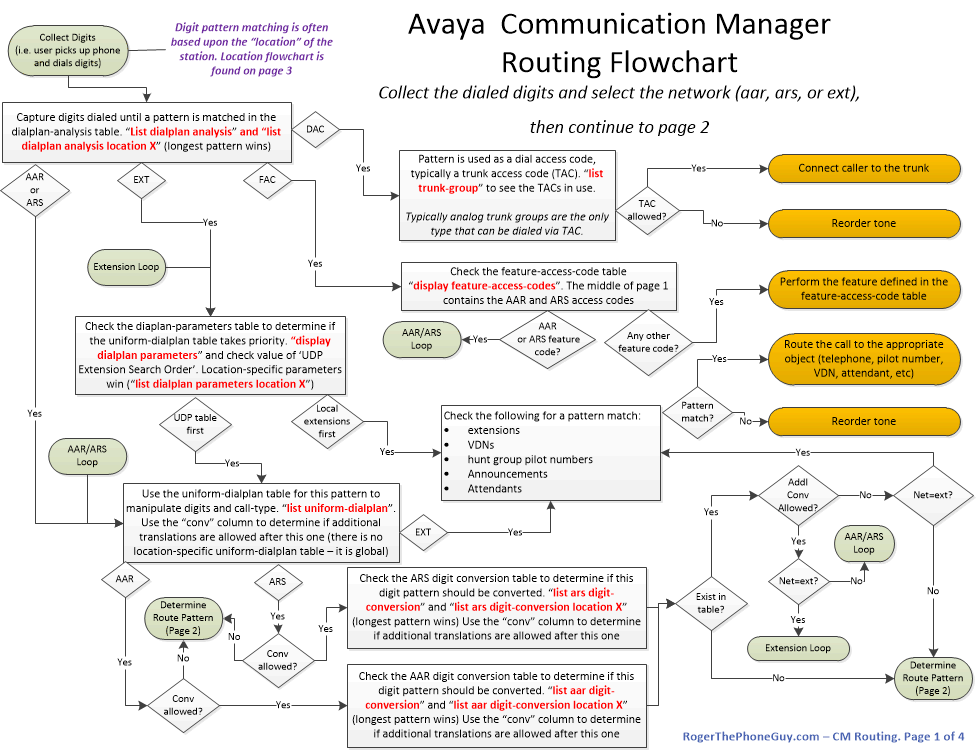
This is almost an oxymoron. PRI interfaces are so common on PBXs that you’d think we would all be familiar with the process of building them. However, since these interfaces don’t change very often, sometimes we will go several years between PRI configuration. Here’s a quick reference for setting up a PRI. This one will use AT&T’s IPFlex BVoIP service, but most PRIs are configured the same way nowadays.

Here are the steps we will perform:

  1. Determine the physical location for the PRI (i.e. what port network or gateway and what slot?).
  2. Determine the trunk group number you will use and the TAC (trunk access code). Often, these will correspond with a site or media gateway. Just do a ‘list trunk’ and you’ll probably see a pattern where the trunk group number should fit and the TAC is almost always based upon the trunk group number.
  3. Find out the line coding and framing for the T1. Almost all T1s are now ‘b8zs’ and ‘esf’. Your carrier can confirm this, but I’ve never seen a voice PRI installed after the mid-1990s anything else.
  4. Find out the service protocol to use. This one is tricky and depends upon the emulation of the carrier’s switch. In fact, their planning docs will often ask you which one you want. And half the time it’s wrong anyway. If the D-channel doesn’t come up, this is usually the problem. It’s either ‘a’ for AT&T custom or ‘b’ for NI-2. It looks like this is used in three different places. The DS1 form, the signaling group form, and the trunk group form all have signaling protocol fields! However, the signaling and trunk group fields are different. When the carrier asks you “are you AT&T or NI2?”, they mean the ds1 itself. I have added some notes at the bottom of this post regarding the service protocols.

First, make sure you have a PRI slot available. I just pushed a PRI card into slot 5 of my G450 gateway (media gateway 10 in my case) so it looks like this:

list configuration media-gateway 10                                    Page   1

                              SYSTEM CONFIGURATION

Board                                                     Assigned Ports
Number   Board Type              Code     Vintage    u=unassigned t=tti p=psa

010V1    ICC MM                   S8300D  HW06 FW001
010V2    ANA MM                   MM716AP HW06 FW098 01 02 03 04 05 p  p  p
                                                     p  p  p  p  p  p  p  p
                                                     p  p  p  p  p  p  p  p
010V4    DS1 MM                   MM710BP HW11 FW052 01 02 03 04 05 06 07 08
                                                     09 10 11 12 13 14 15 16
                                                     17 18 19 20 21 22 23 24
                                                     u  u  u  u  u  u  u  u
010V5    DS1 MM                   MM710BP HW11 FW049 u  u  u  u  u  u  u  u
                                                     u  u  u  u  u  u  u  u
                                                     u  u  u  u  u  u  u  u
                                                     u  u  u  u  u  u  u  u


                press CANCEL to quit --  press NEXT PAGE to continue
ESC-x=Cancel Esc-e=Submit Esc-p=Prev Pg Esc-n=Next Pg Esc-h=Help Esc-r=Refresh

Slot 5 is nice and clean with 24 unassigned ports. First we need to create the DS1, which is really creating the D-channel on port 24. I type

add ds1 010v524

and the DS1 form comes up. It’s only two pages. Fortunately, I have a couple working DS1s from AT&T already so I’ll refer to those. By the time I’m done, my DS1 looks like this:

display ds1 010v524                                             Page   1 of   2
                                DS1 CIRCUIT PACK

            Location: 010V5                           Name: Atlanta BVoIP
            Bit Rate: 1.544                    Line Coding: b8zs
   Line Compensation: 1                       Framing Mode: esf
      Signaling Mode: isdn-pri
             Connect: network
   TN-C7 Long Timers? n                   Country Protocol: 1
Interworking Message: PROGress            Protocol Version: b
Interface Companding: mulaw                            CRC? n
           Idle Code: 11111111
                              DCP/Analog Bearer Capability: 3.1kHz

                                           T303 Timer(sec): 4


      Slip Detection? n                 Near-end CSU Type: integrated

   Echo Cancellation? n          Block Progress Indicator? n


display ds1 010v524                                             Page   2 of   2
                              DS1 CIRCUIT PACK

 ESF DATA LINK OPTIONS

                     Network Management Protocol: tabs
 Send ANSI-T1.403 One-Second Performance Reports? n
                             Far-end CSU Address: b

 INTEGRATED CSU OPTIONS
                                    Transmit LBO: 0db
                                    Receive ALBO: 26db
                                    Upon DTE LOS: loopback


 CPE LOOPBACK JACK OPTIONS
                  Supply CPE Loopback Jack Power? n


Now we create the signaling group, which is the communication layer on the D-channel. Signaling groups can be shared (rarely), so these are split up. They’re very simple. The form is 5 pages long, but page 1 is all that matters:

display signaling-group 110                                     Page   1 of   5
                                SIGNALING GROUP

 Group Number: 110            Group Type: isdn-pri
                    Associated Signaling? y          Max number of NCA TSC: 0
                       Primary D-Channel: 010V524     Max number of CA TSC: 0
                                                   Trunk Group for NCA TSC:
       Trunk Group for Channel Selection:         X-Mobility/Wireless Type: NONE
      TSC Supplementary Service Protocol: a


There is a chicken-and-egg problem here. The signaling group wants to know what trunk group to use, but we haven’t built the trunk group yet. We will need to modify this after we create the trunk group.

Now create the trunk group. After the first page, almost everything is fine with default values. The only fields I end up changing are “send name”, “send number”, and “show ANSWERED BY” on page 3. I typically submit the form before assigning channels on page 5 to make sure the form submits.

display trunk-group 110                                         Page   1 of  21
                                TRUNK GROUP

Group Number: 110                  Group Type: isdn          CDR Reports: y
  Group Name: Atlanta BVoIP               COR: 1        TN: 1        TAC: 8900
   Direction: two-way        Outgoing Display? n         Carrier Medium: PRI/BRI
 Dial Access? n              Busy Threshold: 255  Night Service:
Queue Length: 0
Service Type: public-ntwrk          Auth Code? n            TestCall ITC: rest
                         Far End Test Line No:
TestCall BCC: 4


display trunk-group 110                                         Page   2 of  21
      Group Type: isdn

TRUNK PARAMETERS
         Codeset to Send Display: 6     Codeset to Send National IEs: 6
        Max Message Size to Send: 260   Charge Advice: none
  Supplementary Service Protocol: a     Digit Handling (in/out): enbloc/enbloc

            Trunk Hunt: cyclical
                                                   Digital Loss Group: 13
Incoming Calling Number - Delete:     Insert:                 Format:
              Bit Rate: 1200         Synchronization: async    Duplex: full
 Disconnect Supervision - In? y  Out? n
 Answer Supervision Timeout: 0
          Administer Timers? n        CONNECT Reliable When Call Leaves ISDN? n
             XOIP Treatment: auto    Delay Call Setup When Accessed Via IGAR? n


display trunk-group 110                                         Page   3 of  21
TRUNK FEATURES
          ACA Assignment? n            Measured: none      Wideband Support? n
                                                          Maintenance Tests? y
                               Data Restriction? n     NCA-TSC Trunk Member:
                                      Send Name: y      Send Calling Number: y
            Used for DCS? n                            Send EMU Visitor CPN? n
   Suppress # Outpulsing? n    Format: natl-pub
 Outgoing Channel ID Encoding: preferred     UUI IE Treatment: service-provider

                                                 Replace Restricted Numbers? n
                                                Replace Unavailable Numbers? n
                                                      Send Connected Number: n
                                                  Hold/Unhold Notifications? n
             Send UUI IE? y     Modify Tandem Calling Number: no
               Send UCID? n
 Send Codeset 6/7 LAI IE? y                         Ds1 Echo Cancellation? n

    Apply Local Ringback? n               US NI Delayed Calling Name Update? n
 Show ANSWERED BY on Display? n      Invoke ID for USNI Calling Name: variable
                             Network (Japan) Needs Connect Before Disconnect? n


We still have two things to do – we need to set the trunk group for channel selection in the signaling group, and we need to assign the channels. Before I forget, change the signaling group to tell it what trunk group it will control:

change signaling-group 110                                      Page   1 of   5
                                SIGNALING GROUP

 Group Number: 110            Group Type: isdn-pri
                    Associated Signaling? y          Max number of NCA TSC: 0
                       Primary D-Channel: 010V524     Max number of CA TSC: 0
                                                   Trunk Group for NCA TSC:
       Trunk Group for Channel Selection: 110     X-Mobility/Wireless Type: NONE
      TSC Supplementary Service Protocol: a

Now, for the last step, let’s assign channels! Change the trunk group and set these on page 5 and 6. Note how we assign the signaling group along with the channel. When I get the circuit ID from AT&T, I will put it in the “Name” column along with the DIDs that were provided on this circuit.

change trunk-group 110                                          Page   5 of  21
                                 TRUNK GROUP
                                      Administered Members (min/max):   1/23
GROUP MEMBER ASSIGNMENTS                  Total Administered Members:  23

       Port    Code Sfx Name        Night           Sig Grp
  1: 010V501  MM710  B                                110
  2: 010V502  MM710  B                                110
  3: 010V503  MM710  B                                110
  4: 010V504  MM710  B                                110
  5: 010V505  MM710  B                                110
  6: 010V506  MM710  B                                110
  7: 010V507  MM710  B                                110
  8: 010V508  MM710  B                                110
  9: 010V509  MM710  B                                110
 10: 010V510  MM710  B                                110
 11: 010V511  MM710  B                                110
 12: 010V512  MM710  B                                110
 13: 010V513  MM710  B                                110
 14: 010V514  MM710  B                                110
 15: 010V515  MM710  B                                110


change trunk-group 110                                          Page   6 of  21
                                 TRUNK GROUP
                                      Administered Members (min/max):   1/23
GROUP MEMBER ASSIGNMENTS                  Total Administered Members:  23

       Port    Code Sfx Name        Night           Sig Grp
 16: 010V516  MM710  B                                110
 17: 010V517  MM710  B                                110
 18: 010V518  MM710  B                                110
 19: 010V519  MM710  B                                110
 20: 010V520  MM710  B                                110
 21: 010V521  MM710  B                                110
 22: 010V522  MM710  B                                110
 23: 010V523  MM710  B                                110
 24:
 25:
 26:
 27:
 28:
 29:
 30:

And now it’s a matter of troubleshooting. I plugged in my PRI into the BVoIP router and the first thing is to make sure the D-channel came up. Do this by statusing the signaling group:

status signaling-group 110
                         STATUS SIGNALING GROUP

        Group ID: 110                             Active NCA-TSC Count: 0
      Group Type: isdn-pri                         Active CA-TSC Count: 0
  Signaling Type: facility associated signaling
     Group State: in-service


                           Primary D-Channel


            Port: 010V524        Level 3 State: in-service


                          Secondary D-Channel


            Port:                Level 3 State: no-link

The “Level 3 State” is the state of the D-Channel. If you’re on the phone with your carrier and they ask about the D-Channel, you can give them that status.

Next, status the trunk group itself:

status trunk 110

                             TRUNK GROUP STATUS

Member   Port     Service State      Mtce Connected Ports
                                     Busy

0110/001 010V501  in-service/idle    no
0110/002 010V502  in-service/idle    no
0110/003 010V503  in-service/idle    no
0110/004 010V504  in-service/idle    no
0110/005 010V505  in-service/idle    no
0110/006 010V506  in-service/idle    no
0110/007 010V507  in-service/idle    no
0110/008 010V508  in-service/idle    no
0110/009 010V509  in-service/idle    no
0110/010 010V510  in-service/idle    no
0110/011 010V511  in-service/idle    no
0110/012 010V512  in-service/idle    no

This gives you the channel state within the trunk group. These channels will only come up in-service/idle if the D-channel is good. If you have any problems, you can try to “bounce” the D-channel by perform a busyout then release on the port of the D-channel with “busy port 010v524” in my case:

busyout port 010v524

                             COMMAND RESULTS

  Port      Maintenance Name  Alt. Name          Result           Error Code

  010V524   ISDN-PLK                             PASS

release port 010v524

                             COMMAND RESULTS

  Port      Maintenance Name  Alt. Name          Result           Error Code

  010V524   ISDN-PLK                             PASS

And if the D-channel still won’t come up, that’s when you tweak the service protocol values between ‘a’ and ‘b’.

When you’re on the phone with your carrier trying to turn up service, the ability to bounce the D-Channel, monitor the D and B channel status, and change from AT&T custom to NI-2 is typically enough to get the carrier to work with you and get this working. On rare occasions you may need to tweak the line coding (b8zf/esf) but this has only happened to me once.

As for service protocols, a good friend of mine provided a nice summary from his notes. Remember these apply to the DS1! (i.e. “change ds1 010v524”), not the sig or trunk group forms.

Protocol “a” – AT&T Custom

  • For the layer 3 messaging or 4ESS/5ESS messaging type (Maintenance Protocol Discriminator 03) (TR41449/TR41459)
  • Normally used by Long Distance Companies
  • 4ESS is strictly AT&T Custom for FAS/NFAS
  • DMS 100/250 is AT&T Custom for FAS/NFAS (software load BCS.36 or later)
  • DSC DEX600E is AT&T Custom for FAS/NFAS (used BY MCI and Frontier as central offices)

Protocol “b” – National ISDN 2

  • Bellcore protocol (5ESS LEC messaging for NFAS and DCBU applications, the only way the 5ESS can be set up for NFAS and DCBU) (Maintenance Protocol Discriminator 43) (TR1268)
  • Normally used by LECs
  • DMS 100 will do NI-2 FAS/NFAS (started in the BCS.37 load of software)
  • Starting with the 5E9.0 software load in the 5ESS
  • Normal protocol for connection to Siemen’s EWSD
  • Normal protocol for connection to GTE GTD5

Thanks as always for your time and attention. If you’re interested, I can include a post on routing incoming calls from this trunk group, routing calls out this trunk group, and setting the caller-id for calls over this trunk group. Please let me know your own experiences with setting up and using PRI and IP trunks.

How to clear PLAT-ALM alarms in Avaya Communication Manager

When gateways unregister due to various network blips or maintenance, it can cause a PLAT-ALM in your Communication Manager. These will linger forever until you clear them, It’s very simple but you don’t do it from SAT, you do it right from the shell. To see all of the alarms, login to CM’s shell and type

almdisplay -v

To clear them all, just type

almclear -a

If you still have a problem, the alarm will re-propagate so I haven’t seen the downside.

What happens if you try to “traceSM” when the Avaya Session Manager hasn’t fully booted?

If you try to “traceSM” before the Avaya session manager is completely booted up, you get this. But only when you “start” the trace.

The complete log files are located:
        SIP messages: /var/log/Avaya/trace/tracer_asset.log*
        Call Processing: /var/log/Avaya/trace/call_proc.log*
        PPM: /var/log/Avaya/trace/trace_ppm.log*
Error enabling SM100 trace.

Preparing SCRUCH network filter num SD address:0
Preparing SCRUSH network filter num SH address:0
*** in client update res=28 ***


[cust@nj-pbx-sm02 ~]$

How to update Avaya System Manager from 6.3.3 to 6.3.9

Updating System Manager should not be scary. As I write this, I am updating my Avaya Aura System Manager from 6.3.3 to 6.3.9. I just have to keep the faith in the Avaya engineers.

So here are the steps to perform upgrade this upgrade. It is definitely something you, as a customer, can do yourself. These instructions are from page 22 of this document https://downloads.avaya.com/css/P8/documents/100175367

  1. Download the patch System_Manager_6.3.9_r4602482.bin from support.avaya.com.
  2. Use WinSCP or (or any SCP program) to upload it to System Manager. I used the admin account (with the same password as the web interface).
  3. SSH to the System Manager using the same account as the file upload. The admin account didn’t give me a $ prompt at the shell, but it worked fine. When you login, you should see the .bin file in the default folder (/home/admin/ in my case)
  4. Before you start, you should disable geo-redundancy if you use it. Go to Home->Georedundancy and disable it.
  5. Simply type “SMGRPatchdeploy System_Manager_6.3.9_r4602482.bin” and the patch manager will take over.
  6. The Patch manager will ask you to review and accept the license agreement, then start running. I was warned that it will take about an hour and I should be patient. Unfortunately, I need to test this before I do the redundant session manager, then I need to do my system managers. So I’m looking at a late night and I’d like this to finish. I think my System Manager can tell so it’s taking its time. As I’ve said before – just long enough to panic, plus 30 seconds. In this case, I think it’ll be plus 10 minutes or so. Here is the output from my patching:
admin >SMGRPatchdeploy System_Manager_6.3.9_r4602482.bin
Verifying the patch binary.....
mv: cannot stat `/var/log/Avaya/SMGR_Patch.log.3': No such file or directory
Extracting files to /tmp/patchsfx.p18665...
Adopter_list.txt
CAF.jar
EULA.txt
System_Manager_R6.3.9_4602482.txt
defConfParam.properties
geo_upgrade_util.jar
install.jar
installer_relno.txt
int_postgres_response.properties
mgmt-custom.xml
mgmt-custom.xsd
postPatchHook.sh
runAuditor.sh
runInstaller.sh

Read the following Avaya Software License Terms carefully. The Chinese, German, Portugese, Spanish, French, Japanese, and Russian versions of the Avaya Software License Terms are posted at https://support.avaya.com/LicenseInfo . If you do not have direct Internet access, please access a device that has Internet access to view, download and print the applicable license.

Press the [Enter] key to read the Avaya Software License Terms.

***THIS IS WHERE YOU READ AND ACCEPT THE LICENSE TERMS***
If you agree with Terms and Conditions of the applicable Avaya Software License Terms, please enter "Y" for yes. If you do not agree with the Terms and Conditions, please enter "N" for No.

If you enter "Y", you have read, understand, and agreed to the Terms and Conditions of the Avaya Software License Terms (Avaya Products).  You further understand that by entering "Y" you will initiate the process to upgrade, and/or install the Avaya Product; and continued installations is acceptance of the Terms and Conditions of the applicable Avaya Software License Terms (Avaya Products).

If you do not agree to these terms and enter "N" it will abort the installation/upgrade of this Software.

Do you accept the Avaya Software License Terms? (Y)es/(N)o: y

You have accepted the Avaya Software License Terms. The Software Installation will now begin.
Executing checkForPatchRequisite
Executed checkForPatchRequisite successfully, proceed to install the patch.
Thu Oct 16 22:10:09 EDT 2014 Continue the patch installation in normal way.
Perform cleanup ....
Stopping System Manager JBoss - PID: 6928
.............................................
Stopped System Manager JBoss
/tmp/patchsfx.v29174 /tmp/patchsfx.v29174
Enter the Encryption Key :
Please Wait


Log file has been created at location: /tmp/avaya_aura_install-log_2014-10-16_10.11.42.txt
[ Starting automated Installation ]


Checking if the system has sufficient space as required by the selected packs.

Available Space: 13.9 GB
Total space Required: 1.54 GB


[ Starting to unpack ]

[ Processing package: System Manager - Update Patch (1/15) ]
.
[ Processing package: Conferencing - Update Patch (2/15) ]
.......
[ Processing package: PS SysMgr Extensions (3/15) ]
.................
[ Processing package: IPTCM - 6.2 FP4 S4 (4/15) ]
....................
[ Processing package: IP Office - 6.2 FP3 S4 (5/15) ]
........
[ Processing package: SUM - 6.2 FP4 S4 (6/15) ]
......
[ Processing package: MESSAGING - 6.2 FP4 SP9 (7/15) ]
.............
[ Processing package: INVENTORY - 6.2 FP4 S4 (8/15) ]
............
[ Processing package: MMCS (9/15) ]
..
[ Processing package: CS1000 - 6.3 FP4 (10/15) ]
................
[ Processing package: Session Manager Element Manager (11/15) ]
..
[ Processing package: Collaboration Environment Element Manager (12/15) ]
..
[ Processing package: AMM - Update Patch (13/15) ]
...
[ Processing package: System Manager on VMware (14/15) ]
...
[ Processing package: System Manager Update (15/15) ]
...........
Parsing files
........
File execution started for pack : System Manager - Update Patch
..
File execution started for pack : Conferencing - Update Patch
.
File execution started for pack : PS SysMgr Extensions
.
File execution started for pack : IPTCM - 6.2 FP4 S4
.
File execution started for pack : IP Office - 6.2 FP3 S4
.
File execution started for pack : SUM - 6.2 FP4 S4
.
File execution started for pack : MESSAGING - 6.2 FP4 SP9
.
File execution started for pack : INVENTORY - 6.2 FP4 S4
.
File execution started for pack : MMCS
.
File execution started for pack : CS1000 - 6.3 FP4
.
File execution started for pack : Session Manager Element Manager
.
File execution started for pack : Collaboration Environment Element Manager
.
File execution started for pack : AMM - Update Patch
..
File execution started for pack : System Manager on VMware
..
File execution started for pack : System Manager Update
..
[ Unpacking finished ]
[ Writing the uninstaller data  ... ]
output.response.file /opt/Avaya/autoInstall_Avaya_AURA.properties generated
[Automated Installation Completed !]
Log file has been moved to location: /opt/Avaya/install_logs/avaya_aura_install-log_2014-10-16_10.11.42.txt from location: /tmp/avaya_aura_install-log_2014-10-16_10.11.42.txt
/tmp/patchsfx.v29174
Executing Common Inventory Datamigration script for access point & attributes.
dos2unix: converting file /opt/Avaya/Mgmt/6.3.8//bulkadministration/exportutility/epXmlArtifactProcessor.sh to UNIX format ...
Thu Oct 16 23:18:14 EDT 2014 Restarting JBoss...
Service was not running
Starting System Manager JBoss
.
Service started successfully - PID: 21891
Thu Oct 16 23:18:42 EDT 2014 Patch installation completed and waiting for JBoss to finish start-up... this may take a few minutes
Thu Oct 16 23:39:45 EDT 2014 Patch installation completed and waiting for Quantum init to finish ... this may take a few minutes
QuantumElementType Version mis match in QuantumElementType.xml and DataBase so republishing the QuantumElementType.
dos2unix: converting file tmConfigProfile.xml to UNIX format ...
dos2unix: problems converting file tmConfigProfile.xml
log4j:WARN No such property [conversionPattern] in com.avaya.common.logging.client.CommonLoggingLayout.
post_fix.sh: line 53: ${LOGFILE}: ambiguous redirect
Thu Oct 16 23:48:19 EDT 2014 : Check for the EP Status at the end of patch installation.
START : Execution of ep_process_state.sh
END : Executed ep_process_state.sh with status: 0
Thu Oct 16 23:48:19 EDT 2014 : Executed the domains and Adopter scripts successfully.
Thu Oct 16 23:48:19 EDT 2014 Changing the needful permission for various dirctories
Changed the ownerships of directories successfully..
Thu Oct 16 23:48:20 EDT 2014 Maintenance completed Successfully
admin >
admin >shutdown -r now
shutdown: you must be root to do that!
admin >su root
Password:

        * * * * * * * * * * * * * * * * * * * * * * * * * * * * * * * * * * * *
        *                                                                     *
        * !! Virtual Machine needs to be rebooted as System Manager Patch     *
        *    installation updated the Kernel. !!                              *
        *                                                                     *
        * * * * * * * * * * * * * * * * * * * * * * * * * * * * * * * * * * * *

root >shutdown -r now

Broadcast message from root (pts/0) (Fri Oct 17 00:34:51 2014):

The system is going down for reboot NOW!
root >